Even at the Magic hour--which for me, here in Idaho, are the last TWO HOURS before sunset--you should still be very picky where you point your camera. Sure, most things look great in that warm light, but that's not enough reason for me to snap the shutter. If the object I want to photograph does not have the direction of light from either side or perhaps back light, and I can't move the object to create that direction of light…I PASS IT BY. I want more than just pretty light--I want three dimensionality and texture; I want shadows!
A great way to give your eyes a workout for light and composition is to visit a junk yard at the magic hour and walk through it with your camera and one lens (no tripod) and see how many artistic compositions you can create while watching for great directional light.
f16.0 @ 1/125 sec., ISO 400, Lens @ 65mm
The key to creating art from the jumble of stuff in the junkyard is "narrowing your vision"--Looking for the details in smaller compositions. Many amateur photographers try to photograph too much--using too wide a lens. That's why I prefer zoom lenses. Once I find the BEST ANGLE where the light has direction
f9.0 @ 1/125 sec., ISO 400, Lens @ 70mm
and I have my SHADOWS then, with a zoom lens, I can create any number of compositions--both horizontal and vertical. The reason I don't use prime lenses much is that once I find the perspective I want I like to maintain it while creating multiple compositions by zooming. With a prime lens you must move closer to your subject for a smaller composition and that changes perspective and creates distortion (known as extension distortion). If I want this kind of distortion I'll pull out my fish-eye lens and create something really wild!
Sometimes, though, I'll use a fairly wide focal length to help intensify a composition as in this image below:
f18.0 @ 1/125 sec., ISO 400 lens @ 32mm
Using my zoom at 32mm and filling the frame, with much of the wheel, the wide angle made the axle housing larger (making the DEERE logo larger) and making it a powerful lead-in-line to the wheel.
f11.0 @ 1/80 sec., ISO 400, lens @ 58mm
One of my favorite images on this outing was at the last moments of light just skimming part of this old tractor. I moved my camera position to the shadow side of the tractor to create short-lighting on it's "face" with just enough light still crossing it's radiator. Nice color and texture! This is a good example of creating good light direction, when you can't move the subject, by moving camera position.
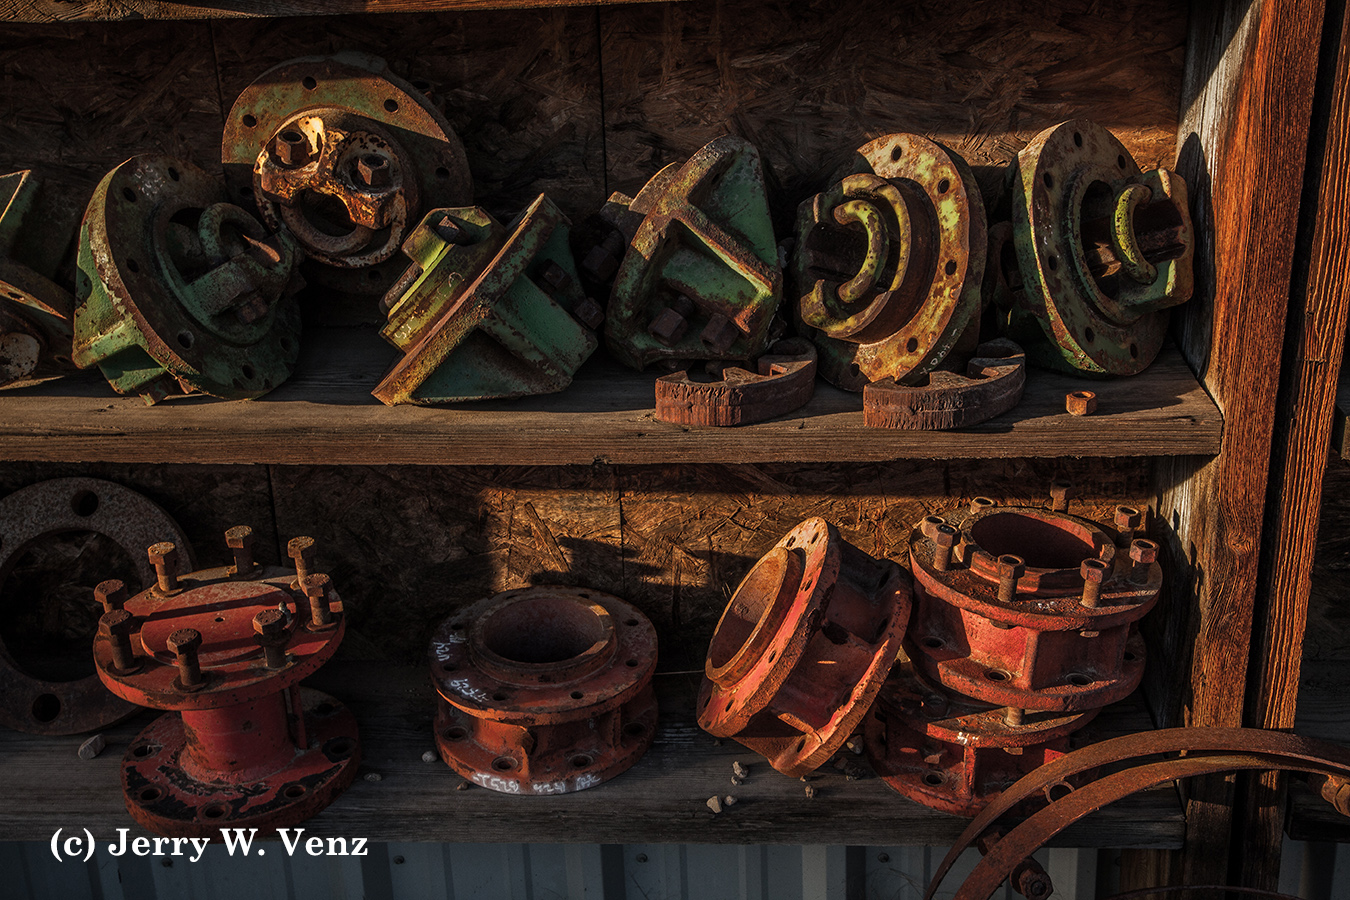
Sometimes attaining great light is about waiting for it. Earlier I spotted this long row of shelves, packed with parts, that were mostly in flat, front light. I passed it by with a mental note to come back here because I knew, as the sun was setting to camera left, that the light would be great in about 30 minutes.
The hardest part here was WHAT to pick as my subject because these shelves of old parts stretched for 40 or 50 feet along an outside wall…and the light was moving fast. Back to NARROWING YOUR VISION; I settled on this end of the shelves because of the rusted hoops at the bottom right of the frame. The light was gone from the hoops 30 seconds after I took this image.
f16.0 @ 1/50 sec., ISO 400, Lens @ 45mm
All of the images I did this day were done with one lens--the 24-105mm f4.0--on my Canon 5D MKII and I used the full range that the lens provided! It was really fun and I created many new images for my Idaho fine art archive.
As always, should have have questions please don't hesitate to ask…'Til next week.
Author: Jerry W. Venz, PPA Master Photographer, Craftsman, Certified Training site: http://www.LightAtTheEdge.com
The single most creative tool we have when we're creating portraits is lens choice. More than anything else the lens you select will create the look and feel of your portraits. Part of that look and feel is making our subjects look their best. And since ALL LENSES DISTORT REALITY, in some way, you need to know how to use that distortion creatively without optical harm to your subjects!
By far the most egregious harm I'm seeing these days, by many so-called professional photographers, is the use of short focal length lenses when doing group portraits. When using a short focal length--or wide angle--lens you of course must move in closer to your subject to properly fill the frame. A short lens, when used too close will distort your subjects in the worst way--the closest part of your subject to the lens the larger it becomes (known as extension distortion). This happens naturally with ALL lenses but short lenses will Amplify this effect!
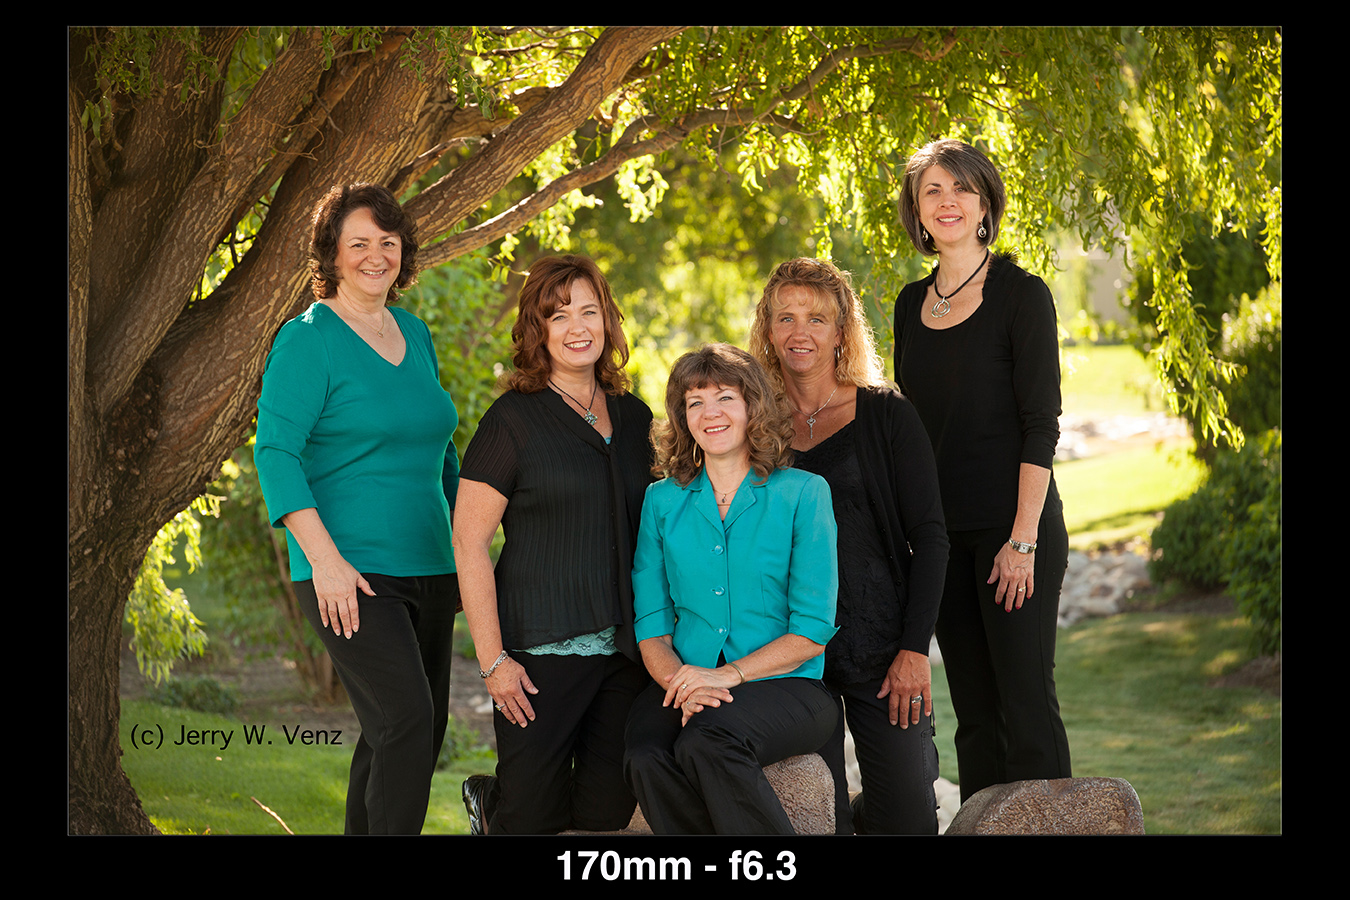
It's particularly important to control this distortion when doing group portraits where you have two or more rows of people. A short lens will increase the head sizes and body mass of the people in the front and decrease head sizes of those behind them. So, with that said, what IS a wide angle lens? My definition, based on hard experience, on where extension distortion begins, is that 50mm or wider are lenses to avoid on most family groups. I'm rarely wider than 135mm on ANY family session. For individuals and couples I'm usually at 200mm, sometimes more.
In the example below even in a small group, in several layers, the effect is dramatic between the 50mm lens and the telephoto.
So, what's happening optically here? The two most important types of distortion are: COMPRESSION DISTORTION and EXTENSION DISTORTION.
Extension distortion: and wide angle lenses: -- optically pull your subject forward and out of the background. The background appears to recede from the subject. -- magnify the natural effect that ALL lenses do: where the closer an object is to the lens the larger it appears. -- These lenses create effects that are not pretty on people!
Compression distortion and telephoto lenses: -- compress the scene the more telephoto you use. -- optically push your subjects into the background. -- coupled with wide aperture, will defocus the background and enlarge any Bokeh. The longer the lens the better the Bokeh!
I like to say that the wide angle lens divorces our subjects from their environment while the telephoto lens marries them to their environment.
For individuals I really up the telephoto to at least 200mm and sometimes add a 1.4x extender. With these longer focal lengths I don't need to use the really wide apertures (like f1.2 to f2.8) to get great Boken in my backgrounds. Those apertures would jeopardize the depth of field I need for portraits--for an individual I most often use f4.5 and I get images like these:
When my students tell me that these longer telephoto zooms are expensive I advise that they should save money on the camera body and invest in great glass first, since you can always move up to a full frame body later and take the glass with you!
Have questions just ask. 'Til next week…
Author: Jerry W. Venz, PPA Certified, Master, Craftsman Training site: http://www.LightAtTheEdge.com
to create a natural three dimensional look not possible using flash. Most photographers using flash outside end-up creating unnatural looking and/or flat light on their subjects.
It's out job as artists to create dimension in our subjects. Artists do this with the contrast of light and shadow. The great artist Leonardo daVinci wrote: "The artist who can make his subject appear to be in relivo (made to appear to have elevation, with depth and dimension) is he who should receive the greatest praise!
So, the alternative I offer, instead of adding light, is the subtractive natural light technique--also called negative fill. This technique is simple, costs you WAY Less in equipment and most importantly the results are far better--than adding light to an outdoor scene when there's usually more than enough ambient light!
To accomplish this you block unneeded light on one side of your subject with a Gobo or a Black Flag. I use Natural Gobos on groups and if there's no natural gobo nearby I'll use a black flag on individuals.
The natural gobos I look for, when I scout outdoor locations, are mostly a stand of trees for groups (it can be one tree for an individual) or you can block light with a hedge or a building--anything that can create a shadow side on your subject's face.
In the portrait of this girl I placed her on a rock right next to a stand of trees on camera left. Then I turned her towards the light (a big patch of blue sky) on camera right.
f4.5 at 1/250 sec., ISO 400, Lens @ 160mm
Time of day is critical for this type of portraiture and it's no accident that I choose this location. I always look for a location where, at about two hours before sunset, there will be light in my background. In this spot the sun is setting over her right shoulder creating a nice kicker light on her hair--a bonus I don't always get. The most important priority though are the trees near the open sky. In other works…THE LIGHT IS AT THE EDGE OF THE FORREST.
The most common mistake I see other photographers make is to go marching INTO the forest, presumably looking for shade or a neat tree, and end up with dull flat light and then they resort to flash! The sad part is they usually walk right past the spot where there was great light on their way into the forest!
f7.1 at 1/100 sec., ISO 400, Lens @ 120mm
We did their family portrait in the same location. Rotating my set-up, the lighting isn't as dramatic on their faces--which is common on groups--but you can still see a soft shadow side on their faces. What sells this as a wall portrait is the setting and the colors and the light.
Using this technique creates portraits that are natural and three dimensional. The methods I use for negative fill are organic and appeal to me in their minimalist style. Give this technique a chance; I think you, and more importantly your clients, will be thrilled with the result.
'Til next week…as always if you have questions don't hesitate to ask. I'd love to see your results…post something you have tried.
Author: Jerry W Venz, PPA Certified Master Craftsman
Training site: http://www.LightAtTheEdge.com
I've read on my Google search of histograms that "the histogram is not a light meter"…O.K. Yes, technically that's accurate. So, I'll posit that the histogram is BETTER than an in camera light meter! Your camera's meter is a reflectance meter that is programed to average out the world's whites and blacks to a neutral grey. That's why when your in camera meter says you're properly exposing something white--it turns out grey. Conversely, when it says you're right on when metering something black--that turns out grey as well.
I quit using reflectance meters 25+ years ago and have relied on incident light meters my entire professional career. However, when digital cameras reared their ugly little heads many professional photographers still had exposure problems, even using their incident light meters, because the digital sensors, especially in our earlier cameras, had a pretty narrow dynamic range. Where our film could handle a scene with a 10-stop range, from shadows to highlights, our digital cameras could barely handle 4 or 5 stops! Our current cameras are much better now, but many photographers till have problems with keeping highlights under control.
The answer is to turn your histogram into a spot meter of sorts--we create what we call the FACE-MASK HISTOGRAM to nail the exposure on the most important part of the scene--the Subject's Face.
All you need is a real portrait lens set to at least 200mm--since you need to fill your camera's frame with a full face and not get in so close that you start to block light that could be falling on your subject. I usually pick as my subject, when doing groups, the person with the most pale skin tone--often a blond--to make sure I don't blow-out their highlights. So, you merely fill the frame with your subject's face--make sure NO HOTSPOTS in the background intrude into this image--and take a picture. I should interject that by this time I've already established my baseline exposure with my incident light meter and have imported the custom white balance image into my camera--so, this face-mask histogram is to refine my exposure.
After you take this close-up image you review your camera's histogram. This histogram of a face usually looks like a truncated mountain. If your exposure is accurate this mound should be centered within the histogram's window with none of your data-pieces of that mountain--hitting either the left wall (under exposure) or the right wall (over exposure).
In this first example the histogram, with my exposure at 1/250 sec. @ f6.3, is headed for UNDER exposure:
So, to shift it over towards the right, I would slow down my shutter speed to 1/160 sec., @ f6.3 and get this result:
NOTE: To adjust the histogram I only change my shutter speed…never the f-stop! I must maintain my needed depth-of-field so the f-stop I've selected can't change. So, I adjust my exposure with a variable that does NOT affect my depth-of-field: The Shutter Speed.
An example of where I don't want my histogram to be, here's one I purposely OVER exposed:
In closing I must give credit for the idea and name of the Face-Mask Histogram to Will Crockett who was teaching this concept back in 2003 when he was working for Fuji USA promoting the Fuji DSLR cameras. He is an accomplished commercial photographer and a great teacher. He helped a lot of photographers, including me, to really refine their digital techniques.
"Til next week….
Author: Jerry W Venz, PPA Certified Master Craftsman
Training site: http://www.LightAtTheEdge.com
Like a lot of professional photographers I was always fine with mailing my customer film to the lab for processing and sending them cut negs for printing. But with the passing (out of production) of most of my favorite films, I'm now way too paranoid to send my precious Kodachrome and Ektachrome Infrared fine art slides anywhere to be scanned! Good scans are running about $15 each without spotting the resulting files (with spotting they are about $45 each!). That would cost me $750 for basic scans and $2250 for scans with spotting! Ouch…
Yes, you can get scans all over the internet for as low as .22 cents and many range from .39 cents to .64 cents each, but these are high-volume (only of mounted slides) and files sizes are typically only 7.3 mb to maybe as high as 18mb…and I had to ship them my negs and slides. None of these cheap options will be high quality; they will not clean my film like I would and they will not dismount my slides to copy them Flat and Full Frame including film edges so that I can print them full frame. You see I was taught forty-years ago that with 35mm you needed to "fill the Frame", when using this tiny format, for the best quality and I did this well!
So, having done a lot of print copy work, for my wife's photo-restoration work, I felt confident that my Canon 5D MKII would produce nice printable files of my favorite slides and negatives. I just needed a good Macro Lens that could do l:l copy work--which I currently don't own. On one of our calls with my son Alex, he reminded me to check out BorrowLenses.com to RENT what I needed for this first pass of digitizing my old slides, before buying one of these Macro Lenses. I ended-up renting the Canon 100mm f2.8 Macro lens for 7-days at a cost of $64.28 with tax and shipping both ways (they had a small special going). I figured this was going to save me a lot of money over having a digital lab do hi-res scans of my selected 50-favorite slides/negatives.
So, here's the process I arrived at after two days of trial and error:
This is the mask I finally came up with to successfully photograph my slides. I found that if I photographed my slides without the mask--just taped to the light box--I got flare through the sprocket holes creating bars of light across the dark areas of the image that ruined the density of the image. Like this:
But, I digress, if you want truly high quality digital copies that require the least amount of Photoshop clean-up from your film, preparation is everything--and that starts with cleaning the film.
BASIC TOOLS NEEDED:
- X-Acto Knife
- 90% Alcohol or higher if you can find it
- Q-Tips - lots of them
- Canned Air
- Hi-intensity desk lamp
- Removable tape (Scotch 811)
- Small flashlight
1) You'll need the X-Acto Knife to split apart the paper slide mounts. Be careful not to crease your slides when pealing them off the mounts.
2) Use the highest percentage Isopropyl Alcohol you can find -- 90% or more -- to clean your slides and negatives. I found that using 70% alcohol there was residue left on the film after it evaporated.
3) Use Q-Tips dipped in the alcohol to clean your film and evaporate the alcohol under the hi-intensity lamp; follow-up with the canned air.
4) Tape your unmounted slides to your light box with Removable tape; it's easy to remove--it won't damage your film and leaves no residue.
5) Use the flashlight and skim across the film you just mounted to the light box to make sure you don't have any dust. If you see dust, just give it a quick blast of air to remove.
COPY TOOLS NEEDED:
- Full frame DSLR
- 100mm Macro Lens (1:1 capable)
- wired remote release
- Light Box
- small carpenter's square and level
- Tripod with 3-way pan head
1) If you want to get the largest Megapixel file of each slide you need to fill-the-frame with each image captured. To do that you must match the aspect ratio of your camera to what you are copying. ie., 35mm file is 24mm x 36mm and Full Frame DSLRs are the same.
2) The 100mm Macro lens will put you within a foot of your light box and at 1:1 you'll get reality recorded on the sensor (eg. a 1" subject will be recorded as 1" on your sensor.)
3) You'll be doing time exposures here so you'll need the tripod and a wired remote release.
4) You need the carpenter's square and level to make sure everything is squared-up and level.
5) The 3-way pan head will allow you to level the camera on it's X and Y axis.
THE SET-UP:
Once you have leveled your tripod head, it is vital that you then make certain the light box and camera's film plane are CO-PLANAR. They must be PARALLEL with each other so you will get a non-skewed image of each slide. If you're not coplanar you'll be creating parallelograms or keystone images that will not fill the frame of your camera.
The simplest method to do this, if the camera is close enough, is to use the small carpenter's square as shown here:
After you get your distance set to get a full frame image, with the slide in focus, you must check that everything square. Since thee are no flat surfaces on most DSLR's except for the front of the lens, you merely place the level across the filter on your lens and slide the rule to the light box until it just touches the surface. If you see an uneven gap, twist the light box to remove said gap.
In addition to being square, you also want the light box to be vertical. You can simply check that with a carpenter's level on the back surface of your light box. I placed my Bogen Tripod grip head, on my table, behind the light box, to apply pressure against the back of the light box to keep it vertical.
CAMERA SET-UP:
I did everything in RAW mode, manual exposure at 100 ISO.The f-stops I used were f8.0 or f11.0 and the exposures varied from 1/2 second to 1.5 seconds depending on the film's density. I would not suggest a wider aperture than f8.0 since I was only getting 1/8" depth of field with the camera and lens set-up 12 inches from my light box.
THAT'S ALL THERE IS TO IT! It was a lot of work, but I did save a bunch of money and my precious art slides stayed in my possession for the whole process.
Should you have any questions, please don't hesitate to ask… 'Til next week…
In case you like to watch videos instead you can view the video located on our YouTube LightAtTheEdge channel…
Author: Jerry W. Venz, PPA Certified Master Craftsman
Training site: http://www.LightAtTheEdge.com