Tuesday, April 28, 2015

WHAT IS GOOD LIGHT AND BAD LIGHT FOR PORTRAITS OUTDOORS? Part 3 of 3

Contrary to what some photographers have claimed on the web there most certainly is good and bad light for portraits.  From what I've seen the photographers who say there is no bad light are usually NOT portrait photographers or they're in the camp that settles for "good enough:" when it comes to light.  Good enough light is never the goal of a professional--I'm always after Great Light no matter what my subject.

If you're just joining in on this topic here's the list of the 5 Types of Natural Light:

1) Direct sunlight (Mid-Day)
2) Fully overcast sky
3) Blue Sky (indirect sun)
4) Sunset (magic hour) or sunrise
5) Window Light (or open door way)

Now, picking up where I left off;

4)  Sunset (Magic Hour) or Sunrise:
At the end of Part 2 I covered Sunset, so I'll move on to Sunrise and Morning light.  Sunrise is not quite a Magic Hour, but sunrise can offer great light. You just can't count on it like sunset's magic hour. When you do get great sunrise light it's very temporary.  As the sun comes up the higher the sun the worse the light becomes.  So you may only get 15 minutes of great light.  This is why I prefer sunset light--here in Idaho I can start photography in some of my locations 3 hours before sunset and with our latest sunset, in the summer, at 9:30pm, we can do a lot of photography in that window of opportunity.  The best thing about sunset light is that the light just gets better and better as the sun goes down!

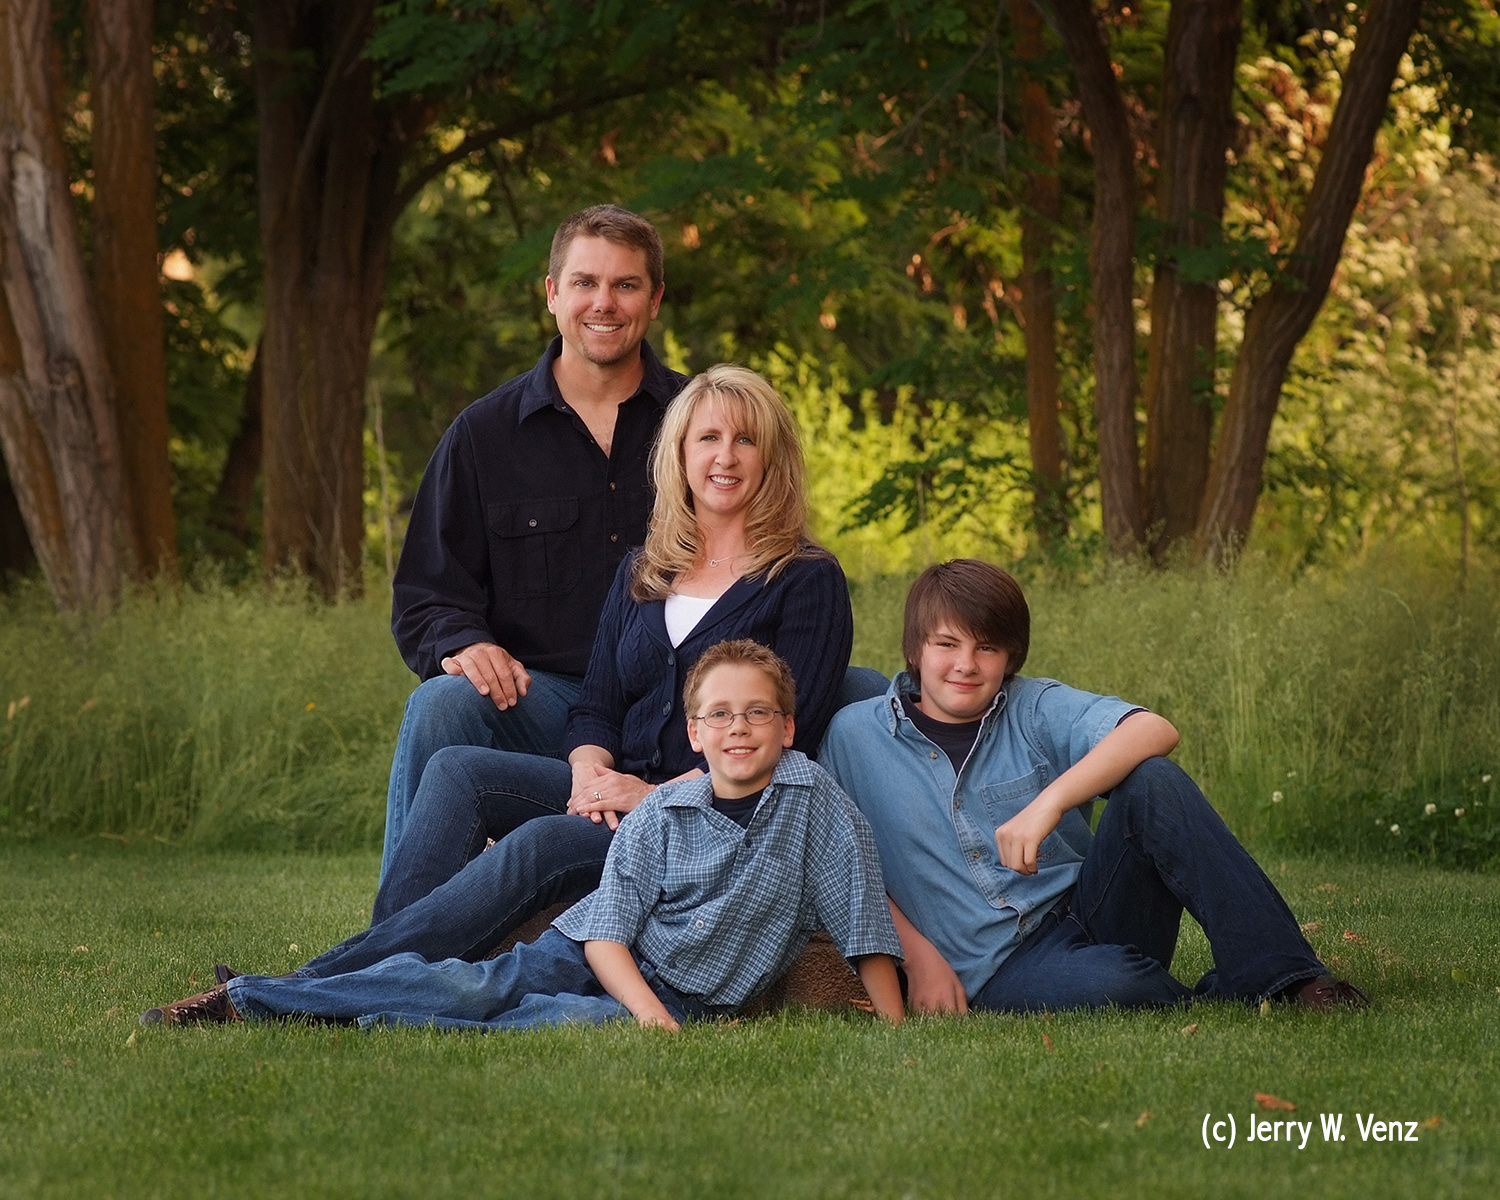
True sunrise is too early for my portrait clients, so I looked for a morning location that had lots of shade at around 8 to 8:30am.  I found this location within walking distance of our home.  It has three large trees making nice shade as the sun comes up behind them. My camera is pointing toward the rising sun, putting the light behind my subjects, just as I do with my sunset locations.

f6.3 @ 1/125 sec., ISO 400 captured at 8:01am
I use this morning location exactly as I use a Blue Sky or Magic Hour location--I just can't use it for more than 30 to 40 minutes or the light in the background will just blow-out. (That pesky dynamic range rears it's ugly head!)

5)  Window Light   (Open Doorway, etc.)
This is one of my favorite sources for portrait light.  I could write a whole blog (I think I already have!) on this one type of light.  This kind of nice directional light can be had not just at a window--you can create this light with an open door at someone's home or by opening the big doors of a barn or out building.  The key to great window light portraits is to have your subject close to the window or doorway and NOT show the window or doorway.  I believe that the window or doorway is a LIGHT SOURCE and NOT a subject!  In studio photography we don't show the soft box in our portraits--so why show the source here?  Besides offering a distraction from your subject you then add a big hot spot in the scene that again messes with dynamic range!

On most of our weddings these past 25 years I've sought to do our bride's portraits by window light.  Here's an example of one of our bridal portraits using an open doorway.

I placed her about 4-feet from the doorway and had her bring her nose towards the light source until I could see the light just touch her left eye.  That eye became the near eye to my camera and that's where I focused.

f3.5 @ 1/160 sec., ISO 800
Now, Back to Overcast Sky.
One thing it is good for is soft, overhead, top light, which is ideal for Horizontal subjects like cars. The mostly horizontal shiny surfaces of cars are ideal for a soft top light.  That's why when commercial photographers photograph cars in the studio they use huge soft boxes suspended over the car. 

The reason this kind of light is so poor for portraits is that people's faces are vertical subjects and with our eyes sheltered by our brow you lose the light in the eyes when the main light is primarily top light.  The image below was taken on an overcast day--you can see the clouds in all the windows.  It's a very nice soft light for the car's reflective surfaces. In addition, the background grass area has been darkened by the gobo (light blocking) effect of the trees giving me good separation of the car from the background.
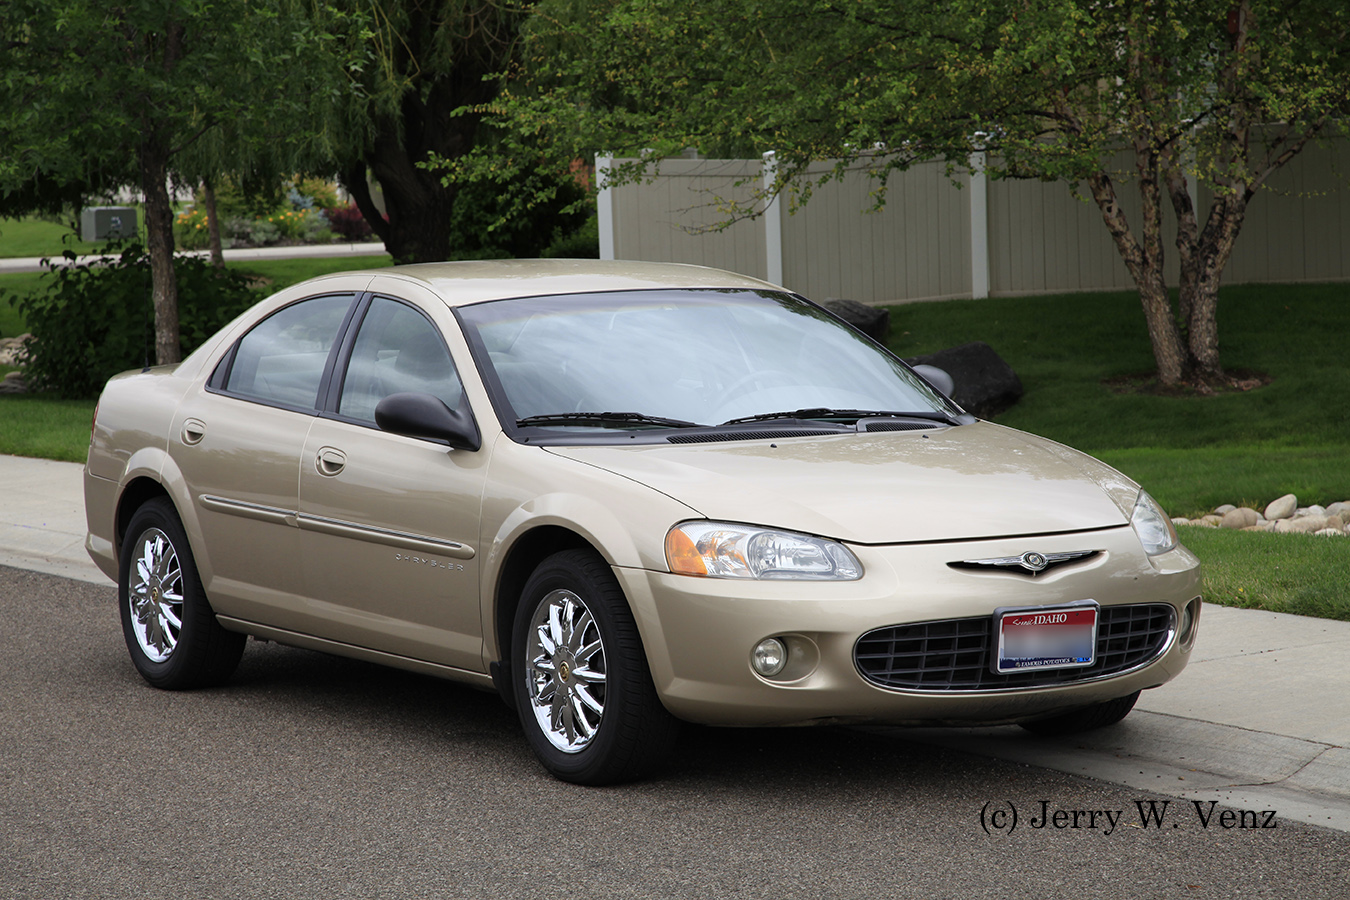
f11.0 @ 1/250 sec., ISO 400
So, there is a use for most types of light outside.  As professional photographers we must know what is the best light for any given subject and how to use or modify that light to make our subject look their best.

As usual should you have any questions or comments don't hesitate to make them.  'Til next week…

Author:  Jerry W. Venz, PPA Master Photographer, Craftsman, Certified
Training site:  http://www.LightAtTheEdge.com

Tuesday, April 21, 2015

WHAT IS GOOD LIGHT AND BAD LIGHT FOR PORTRAITS OUTDOORS? Part 2 of 3

In Part 1 I talked about types of light commonly used for portraits….

1) Direct sunlight (Mid-Day)
2) Fully overcast sky
3) Blue Sky (indirect sun)
4) Sunset (magic hour) or sunrise
5) Window Light (or open door way)

1) Direct, Mid-day, Sunlight
is just plain EVIL on people!
It shall not touch my subject's faces--or ANY part of their bodies--Ever.  Direct sun is a very hard, harsh, light that is uncomfortable for your subjects--all you're going to get are unrelaxed faces and squinting eyes.  Only amateurs would torture their subjects with this type of light.

Note on Dynamic Range:  Even if you put your subjects in the shade during Mid-day sun (if you can find enough shade) you'll have a problem if the sun is hitting your background. Now you must contend with the BIG difference in luminosity between your subjects in the shade and the sunlight on your background; that can be a 5 or 6 stop difference.  When you're correctly exposed for your subjects in the shade any sunlight hitting grass will just go white--the scene will have too high a dynamic range.  This is just another reason why we wait until one or two hours before sunset to do our portraits outside--to LOWER the scene's dynamic range.

2) Fully Overcast sky is actually the worst light (even worse than direct sun) for portraits of people.  At least with direct sun I can still find a location where I could place an Individual and get something when I'm forced to, like in a wedding situation.

Here's the list of problems with this light;
a.)  The light is very flat and dull. You lose the three dimensionality in the scene because there's little difference in light between the foreground, the subjects and the background--now your dynamic range is too low!
b.) The light is mostly Top Light, which means that getting light into your subjects eyes is difficult--you'll get the dreaded Raccoon Eyes!
c.)  Color intensity is very weak.  You can create acceptable skin tones with a custom white balance, but the background usually goes dark and dull. With no light in the background or hair light you'll have poor separation between your subjects heads and the background.
d.)  The ISO you may be forced to use on any overcast day can affect image quality.  With clear blue sky as my light source, to get the f-stop I need for a group portrait (f6.3 to f7.1) with a safe shutter speed (1/100-1/250 sec.) I START at ISO 400, then, if we are within an hour of sunset, towards the end of the session, I bump the ISO to 800, especially if I'm doing individual portraits of kids.

On an overcast day to get the f-stop/shutter speeds I need, I must START at 800 ISO and then as the light fades I must go to 1600 ISO.  Can YOUR camera produce the quality needed for a 24x30" wall print at 1600 ISO?

3) Blue Sky -- Indirect sun
Everything that's wrong with overcast sky light is corrected with clear blue sky; especially when done one or two hours before sunset.  (Note: Look at the family portraits in Part 1 for a direct comparison, at the same location, of blue sky light versus overcast sky light.) The key here is placing your subjects properly to utilize the blue sky as your main light source.

4) Sunset (Magic Hour)
is great light for just about any subject--landscapes to portraits, bikini clad models to horses on the beach or anything on the beach!

Sunset "Magic Hour" f4.5 @ 1/500 sec., ISO 400, Lens @ 200mm
This image of a high school senior, Lacrosse athlete, was taken just 15 minutes before sunset.  This is the only kind of direct sunlight I allow on my subject's faces.  Notice that because my subject and background are in the same light there is no difference in their proper exposure therefore, dynamic range is not an issue.

Sunset on the Beach:  We did a lot of beach photography on many beaches in California--it was one of our specialties. However, we discovered that our sales were better when we treated a foggy beach day as if it were your basic overcast day inland.  The fogged-in beach did similar things to the light that the overcast sky does.  The light goes Cold and all the color goes out of the scene.

f8.0 @ 1/500 sec., ISO 400
This image shows what I'm after at the beach.  I want that warm glow on my subject's faces. See how the setting sun is skimming across the rock arch behind them revealing nice detail.  The waves look better in this light as well.  We always called ahead to the ranger station at our favorite beach, an hour before we left for the session, and if they said it was foggy we canceled the session and rescheduled. Back then we were able to get our permits with a block of time to allow for foggy day reschedules. We knew that if we started a session in the fog it only got worse--we'd only get one look.  If however, the fog bank was out to sea when we started the session and then came in during the session we could get two different looks to the session, and that was a bonus during the sales presentation.

In Part 3 I'll talk about how I use Sunrise or Morning light and one of my favorite types of natural light--Window Light, open doorway or barn light.  I'll also circle-back to a good use for overcast sky light.

Author: Jerry W. Venz, M.Photog., CR, CPP
Training Site:  http://www.LightAtTheEdge.com

Tuesday, April 14, 2015

WHAT IS GOOD LIGHT AND BAD LIGHT FOR PORTRAITS OUTDOORS? Part 1of 3

When doing portraits of people outdoors there is most definitely good useful light and utterly horrendous bad light!  As a professional portrait artist you must know the difference, be able to see where the good light is, or know how to modify or control the light, in your selected location, to make your subjects look their best.

All of our natural light is created by our Sun, but for our purposes, as portrait photographers, we are concerned with these 5 Types of Natural Light:

1) Direct sunlight (Mid-Day)
2) Fully overcast sky
3) Blue Sky (indirect sun)
4) Sunset (magic hour) or sunrise
5) Window Light (or open door way)

As I just stated our source is the sun, but the worst lights and the best lights on this list are sunlight modified by our environment or atmosphere.

One of the environmental modifications we often use is the Open Shade created by trees. This is what I look for as one of my criteria for a good outdoor location.  Unfortunately, I see many photographers placing their subjects into deep (closed) shade, thinking that if a little shade is good then total shade must be better. They seem to think that the shade IS their light source. NO, shade is NOT a good light source.  SHADE IS A TOOL TO BLOCK LIGHT, it's my Gobo, creating negative fill (like my trees) for my subjects.

In my first example I placed this family in open shade created by a line of trees at camera right, but their Key Light is a big patch of Blue Sky from the Left.  In addition, because I choose the time of day (about 2 hours before sunset) I've got nice light in their background.
Great Light: CLEAR BLUE SKY
The portrait below, in the Same Location--everything's in shade due to a fully overcast sky…

Poor Light: OVERCAST SKY
Now we've lost the great directional quality to the light we had on the previous family because most of the light when it's overcast is TOP LIGHT. Because of that top light their eye sockets go dark--giving them the dreaded "raccoon eyes".

The overall color is now flat and dull--even through we have fall colors in the background--because there's no back light.

If I think we're going to have a fully overcast sky on a session I cancel and reschedule--I treat it like a rain day. There are those exceptions, like in the above image, when a reschedule can't be done, and then you do the best you can given the light.

Next week I'll go down the whole list of the 5-Types of Natural Light and their uses. 'Till next week…

Author:  Jerry W. Venz, PPA Certified, Master Photographer, Craftsman
Training site:  http://www.LightAtTheEdge.com

Tuesday, April 7, 2015

USING THE LOCATION TO CONTROL NATURAL LIGHT PORTRAITS

When doing portraits outdoors the location determines EVERYTHING:
1) It creates the background.
2) It creates the base and/or foreground.
3) It provides the GOBO for Negative Fill.
4) It determines the Direction of your Key Light.

Because I BUILD THE PORTRAIT FROM THE BACKGROUND ---> FORWARD. I'm obviously VERY PICKY about finding my locations. (see list above!)     Here is my method: 
1) I go out looking 2 to 3 hours before sunset.
2) I approach from the East looking West.
3) I'm looking for trees with a Glow--I want back-light--No Glow? Then the foliage is too dense. I don't want a dead background!
4) For group portraits I look for grass or sometimes rocks as a base.
5) In addition to the treesy background I want more trees or tall bushes on ONE SIDE. (My GOBO)
6) On the Opposite side I want a large patch of open sky. (My Key Light).

The key to making all these elements create great light on your subjects is PLACEMENT of your group.  My primary rule for natural light portraits, taught to me many years ago, by the Master of natural light portraits, Leon Kennamer, using the subtractive method, is that, "THE LIGHT IS AT THE EDGE OF THE FOREST."

Leon taught that being NEAR the forest gives us the best light and Open Shade for our subjects.  If you move your subjects INTO the forest your light becomes blocked giving you primarily top light (creating "raccoon eyes") and closed shade.

Then what do these misguided photographers (that drag their subjects INTO the forest) do when they see the dreaded "raccoon eyes" on their subjects? They do the worst possible quick fix and blast their subjects with flash! So much for the look of natural lighting…

In my featured portrait below I placed this family of seven under the front edge of the canopy of that great tree to camera left.

f7.1 @ 1/125th sec., ISO 400, Lens @ 112mm
It was done on a clear day at the end of June at 6:30pm. It's obvious why I chose this location-that back-lit background and tree are gorgeous! What you don't see (but that is inferred in the lighting) are the line of trees & bushes at camera left (creating the shadow side on their faces.)  their key light is from a huge patch of blue sky from camera right.  In addition they are placed so that the back-light is providing each of them with hair light.  I don't always get hair light on a whole group--my priority is good light on their faces--so this was a nice bonus!

What I really like about this image is the three dimensional depth provided by this background. Not counting the tree, which has two main layers, you have three layers behind them--the bushes, the rocks and the out-of-focus trees in the deep background.  This image was their pick for a large wall portrait and we used it for a display (24"x30") in our studio sales room.

As usual, should you have any questions don't hesitate to shout out.

Author:  Jerry W. Venz, PPA Master Photographer, Craftsman, Certified
Training site:  http://www.LightAtTheEdge.com