Tuesday, January 26, 2016

PRODUCT PHOTOGRAPHY ON LOCATION

Product photography on location, particularly using a natural setting, is very challenging compared to the studio.  In the studio we have hundreds of tools that enable us to support and manage a product not to mention a vast array of lighting options, modifiers and shapers that we rely on to confidently create great images. Most of these tools we must leave behind when we are tasked with creating images of products in a truly unique natural environment. 

When we were approached to photograph a new line of hair care products I suggested the beach as a location, but not just any beach, a special beach I had been holding in my locations list for small products just like this!  So, off we went to this marvelous little California beach arriving there about an hour and a half before sunset on a beautiful August day.

Our client had given us 25 products to photography and we quickly learned that just getting three of these bottles placed on these crumbling rocky niches any where near straight, level or vertical was a real challenge!

Here, Kathi my lovely wife, assistant and product wrangler, sets-up a “simple” threesome. 

While she was occupied with that I did a simple single bottle in direct sun to get that nice color projected shadow on the rocks…


Easy, nothing to it with one subject! Well, I didn’t much like that first location that Kathi was working at, so we moved to a lower location that was more interesting.  Kathi quickly learned that to make these bottles vertically parallel she had to  make little piles of sand under the bottles to correct their tilt…


Here she’s moving little piles of the very abrasive sand (not good on her manicure for sure!) to make the corrective foundations.


f9.5 @1/125 sec., ISO 400


As you can see the lighting was changing fast as the sun went lower and we still had a big set-up to do.


On to the “Group Portrait”

I noticed a nice area on the cliff wall where we could place a lot of bottles and since the direct sunlight was no longer blasting this area we went to work placing bottles as fast as possible—the light was only going to last for maybe 30 minutes more.  We managed to place 18 bottles in a nice arrangement and they look pretty darn straight! 


Here is the final image…


Getting all those bottles to nest in those lumpy hive-like pockets in such a nice composition and getting them that straight and parallel to each other was tough.  All I can say is Kathi did an outstanding job—especially putting up with me as I critiqued her placements or informed her of any bottles that were tilted as I observed from camera position! 

Another good piece of information…pick your assistants well…they can make or break a job.

’Til next week…Don’t hesitate to ask questions and comments are also welcome…

Author:  Jerry W. Venz, PPA Master Photographer, Craftsman, Certified
Training Site:  http://www.LightAtTheEdge.com

Tuesday, January 19, 2016

ARTISTICALLY POST PROCESS OLD BLACK & WHITE NEGATIVES

One of the things I miss most about my film capture days was the marvelous grain I could get with TRI-X or my favorite T-Max 3200 pushed to 6400 ISO; now that was grain!

So, with this in mind I started to “digitize” some of my favorite color slides and B&W film to see if I could improve them post capture with the modern tools, like Photoshop, we didn’t have 40 years ago.

To speed up the process I used my Canon 5D MKII with the Canon, 100mm f2.8, Macro Lens and shot each neg and slide on my light table. There was a lot less clean-up using this method than our previous attempts at scanning my film; and the results in quality were quite good.  (I made a video on how to do this on my Light at the Edge YouTube channel ( https://www.youtube.com/watch?v=V3CyAq84vzw )…and in written form here in a past blog-March 3, 2015 http://http://www.goboist.com/2015/03/digital-copies-of-slides-and-negatives.html ).


So, getting back to grain, the image below is what I’m talking about…

Final version: Tone mapped in Photoshop using customized “Dramatic” Preset
This image of the famous funny car Chi-town Hustler, doing its signature 1/8th mile burn-out was taken in 1969 on TRI-X film. It was never grainy enough for me and it would be a few decades before Kodak would release my favorite B&W film (T-Max 3200) so this image had to wait until now to be fully realized.

Single image tone mapping in Photoshop is really hit and miss much of the time and the presets are often horrendous! But, I found that I could get some stunning results with two or three of them when I altered the parameters in “Depth”, “Detail”, and “Drama”, and was careful with “structure” so things didn’t get out of hand.

Original Negative

Postive Reversal
The images above show my camera capture of my original negative, on the top, and the positive done in Photoshop, bottom; using Image—>Adjustments—>Invert, to create a new positive.  You can see why I was not enthused with the positive as created. It’s flat and dull (lacking contrast) and the grain structure is too small for my taste.  So, it was a natural for the “Dramatic” mode in Photoshop’s Single Image Tone Mapping program! It did  take some tweaking of contrast and the black point to counter tone mapping’s tendency to tonally flatten images.  

It’s really been fun experimenting with the digital copies of my old Kodachromes, Ektachromes and B&W Negs in Adobe Camera Raw, Single Image Tone Mapping and NIK. It’s pretty much a dry version of the darkroom work we used to do, but on steroids!

So, take a look at the video or the blog version, transfer some of your own images and have some fun.  Should you have any questions don’t hesitate to ask.

“Till next week…

Author:  Jerry W. Venz, PPA Master Photographer, Craftsman, Certified
Training site:  http://www.LightAtTheEdge.com


Tuesday, January 12, 2016

CROPPING FOR ARTISTIC COMPOSITON - POST CAPTURE

In a previous blog I talked about “narrowing your view” or cropping in-camera to create compelling compositions; I tell my students, “You can often reveal more about a subject by showing less”.

This week I’ll cover post capture cropping. This technique is generally for new versions of an image I created long ago. I may notice something within an image when I zoom-in on it, in the Bridge (Photoshop), that makes for a more dynamic version of the subject.

This is not the ideal method to crop, especially with digital images, since with a severe crop, you can eliminate half or more of your image pixels, which will severely limit the size print you can make and still maintain quality.  However, if you’re using a camera with 20 mps or larger (on a large size sensor) this technique can produce great results.

f9.0 @ 1/250 sec., ISO 800, Lens @ 70mm
The image above is a pretty small piece of the original image—and I kicked myself for not zooming in with my other telephoto (in my camera bag!) after I saw this!  It just shows you that even we professionals miss things in the excitement where there’s a lot of action like a hot air ballon launch.


So, here’s the original vertical image. I only captured the moment—it’s centered and static. 

The cropped horizontal version is far more dynamic with much better composition, since I placed the people in the lower R.H. “crash point” following the Rule of Thirds


f11.0 @ 1/200 sec., ISO 800, Lens @ 200mm
The image above, from my barns in fall series, was cropped as much as I could since my lens was zoomed to it’s 200mm maximum.  But, this was still more barn than I wanted relative to fall colors. So, I cropped in and created a more dynamic image with this strong diagonal composition


In addition it’s now easier to see through the barn’s roof through that window now that it’s larger—much better!

f8.0 @ 1/150 sec., ISO 400, Lens @ 118 mm
This image is close to where I wanted it in composition—when I captured it I kept the horizon line way from the middle of the image, but it still lacked the punch I wanted. So, I did this…


Now the horizon line is shifted atypically high in the frame. I kept that nice foreground material, but this new crop changed that squarish boring composition to a long skinny that works better with the line of sailboats across the top.

There are many more compositional “rules” that you can find on-line. Using any of them is generally better than simply centering your subject within the frame!

As usual, ask me questions or make comments…’Til next week…

Author:  Jerry W. Venz, PPA Master Photographer, Craftsman, Certified
Training Site:  http://www.LightAtTheEdge.com

Tuesday, January 5, 2016

BLENDING FLASH AND NATURAL LIGHT OUTDOORS

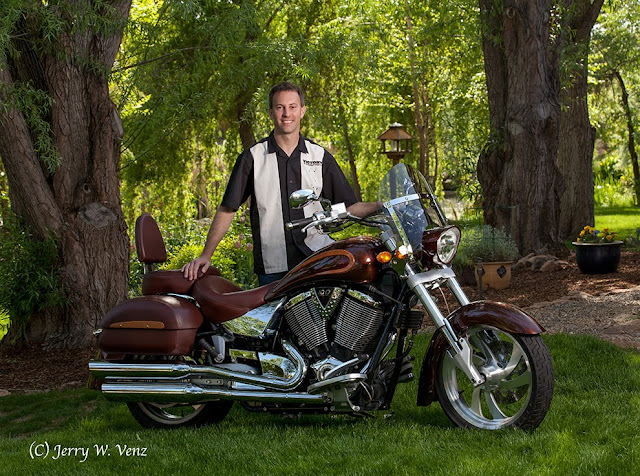
Natural light outdoors is my preferred source, especially when doing people. But when the main subject is an object, as in this commercial product shoot, with a lot of dark features mixed with very shinny parts, like this new retro-motorcycle, supplemental light is often required. To control the highlights in the chrome and polished alloys we set-up in the shade and started as late in the afternoon as we could to lower the difference in exposures between the natural light background and the shaded grass area.  This procedure effectively reduces the dynamic range of the scene.


f8.0 @ 1/125 sec., ISO 400, lens @ 85mm
This final image was a very simple lighting set-up.  I have a single 50” Halo, shoot-through, umbrella/soft box just out of frame on camera right. On camera left I placed a 42” sil-foil (silver) reflector.  That’s it—the rest is balancing the exposure between the background and the flash.

Here’s the before image done by natural light alone..

f8.0 @ 1/60 sec., ISO 400
It’s OK, but for a commercial image the light is too flat and dull—it needs more punch to bring the motorcycle “forward” to the viewer.

Key Point:  Natural light in portraits outside tends to “push” your subject into the environment.  While adding flash on subjects outside tends to “pull” the subjects out of the environment. 

Balancing the Light

The scene metered (incident light) f8.0 @ 1/60 sec., at ISO 400 by natural light. So, I used f8.0 as my aperture setting and metered my flash to be f8.0 at subject position.  Next, I adjusted my shutter speed to control the natural light level in the scene.

Key Point:  Just like studio photography, when doing photography outdoors with flash, the camera’s aperture controls the flash exposure and the shutter speed controls the ambient light.

For example: If you want the camera to see a lot of a room’s existing light you simply “drag the shutter” (set a slower shutter speed), along with your flash to brighten up the scene.  This is a common technique we used in wedding photography.

As you can see in the natural light image above the background is a little “hot”, so to bring it’s exposure down I bumped my shutter speed up (faster) and did test shots until it looked good on my camera’s screen.  Don’t you just LOVE our digital camera capabilities! I know I do!  In the old days, on film, we did this testing with Polaroid film backs on our medium format cameras—it was slow and time consuming.

I ended-up at 1/125th sec. (not much of an increase in shutter speed) because after a half-hour of testing the sun’s lower position had decreased the background light.

We brought the bike out into the sun to do detail shots of the bike’s custom paint and detail features in close-up.

Then my Photoshop Diva (my wife Kathi!) made this poster for our cross promotional advertising campaign.


Showcasing their custom paint artistry using our artistic talents was a fun collaboration. 

Hope you enjoyed…should you have questions don’t hesitate to ask…’Til next week…

Author:  Jerry W. Venz, PPA Master Photographer, Craftsman, Certified
Training site:  http://www.LightAtTheEdge.com