Tuesday, October 31, 2017

SIMPLE B&W CONVERSIONS FOR DRAMATIC IMAGES

I like my B&W images to be very dramatic. If the color image I start with does not have dramatic lighting for texture or at least dramatic blacks with good contrasting whites then I leave it as a color image.

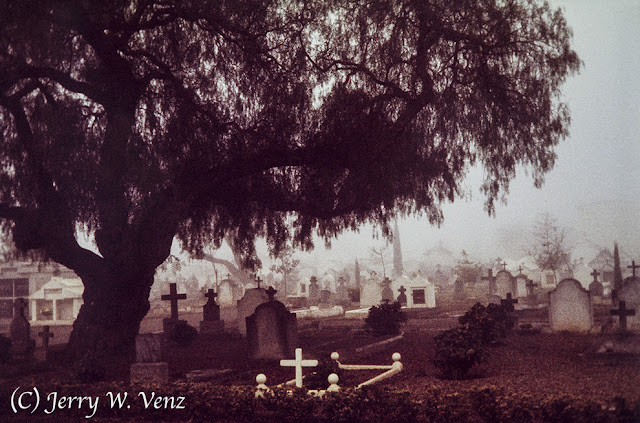
This first image conversion is from an Ektachrome High Speed Color slide from a cemetery series I did back in 1975.  I did not scan the slide to create my working digital file—I photographed it using my Canon 5D MKII using a macro lens. To see how I did it check out my YouTube video, Copying Slides and Negatives with a DSLR…you’ll find the link located at the bottom of the article.

Here’s the cropped B&W conversion….


For this conversion I worked with the 25.7MB RAW file in ACR (Adobe Camera Raw). Like all the other Pros on the web, I’ll warn you not to just de-saturate your file with that tempting slider, at the bottom, in ACR Basic; that’s a No, No!
  • Instead I use the HSL/Greyscale (it’s the fourth box over from the Basic box below the Histogram/data display)
  • Then you check the box—Convert to Greyscale
  • Now you’re in Greyscale Mix-Auto
  • Click on Default (next to Auto); I don’t do anything in Auto—I want total control of all values!
  • Now you have control of 8 - color sliders, from Reds to Magentas, giving you control of tonalities throughout the image.
Here’s my original color image….


Because I wanted this image to be grainy I used Kodak Ektachrome H.S. Daylight film and had it pushed to 1000ASA. This produced nice big grain, but also induced the brown cast in the slide that I never really liked.  So, 42 years later I have a B&W version of this image that I’m happy with!

For this next image we’ll start with a digital file from my old Fuji Pro S5 camera done in this century! Like last time here’s the end result…

This conversion was done using the ever popular NIK, Silver Efex, Pro 2 software. This is probably the easiest, and at the same time, really effective B&W conversion out there.
  • Once you open your file in NIK you have a Pre-set Library of 38 different styles of conversion to try out.
  • Then you can modify any selection with the color sliders or levels and curves.
  • Then you can go wild in Film Types—film emulation modes—where you have 18 film types to choose from.
  • In addition there are Global Adjustment sliders.
Here’s the original color file…
 f13.0 @ 1/400 sec., ISO 400; Lens @ 170mm
This was a nice vertical image in color, but I think the weeds were a distraction from the old barn wood when converted to B&W.

I tend to do a lot of cropping in post; when I see my images in two-dimensions I often see something I didn’t see on location.

Don’t hesitate to ask questions…’Til next week…


Author: Jerry W. Venz, PPA Master Photographer, Craftsman
Training site: http://www.LightAtTheEdge.com
Client site: http://www.TheStorytellersUsa.com

Tuesday, October 24, 2017

CREATE THE BEST FALL COLORS WITH BACKLIGHT!

I always look forward to our marvelous fall colors here in Idaho. After all Boise is called “the city of trees” for a reason. And not to be outdone the fall colors in Eagle, Meridian, and Nampa are always great as well.

My style of photography is different than the many photographers’ work I see on the web—especially those in the East—where they often do wide views of whole forests ablaze in fall colors. That’s OK if all you want is a “record shot” of fall colors, but those pictures usually remind me of the pictures amateurs take, at those tourist viewpoints, at the marked turn-outs along side the road at National Parks.

As artists I think we must delve a lot deeper into our subjects than the amateurs and tourists. I mean that literally when it comes to fall colors.


These are my techniques:
  1. I walk into the outer edge of the forrest looking for backlight.  If you go too deep into the forest you lose the backlight.
  2. This means that the sun must be visible; you’re not going to get good backlight on a cloudy day.
  3. I don’t use wide angle focal lengths. Most of the time I use my 70-200mm f2.8 zoom lens.
I’m looking for details like this….

 f11.0 @ 1/500 sec., ISO 400; Lens @ 105mm
This image with its crisp detail, due entirely to the strong backlight, speaks volumes about the nature of autumn.

NOTE:
  1. As seen in this image, I look for layers of leaves to create some dark contrasts within the composition. The silhouettes of the smaller leaves behind my larger backlit leaf creates that contrast.
  2. I’m also very aware of the background behind any subject I photograph. If I can’t get a near perfect background behind my subject (here I wanted a dark contrasting background) I simply move-on to another subject.
  3. I used f11.0 as my aperture here to create maximum sharpness in all these leaves knowing that my background would still be nicely out of focus (with nice bokeh) because that background is about 50 yards behind my subject.
In this next image I wanted a softer look….

f4.5 @ 1/500 sec., ISO 800; Lens @ 200mm
Here my tree is part of the background so to knock it out of focus I picked f4.5 as my aperture to give me just enough depth of field for my branch of colorful leaves in backlight. This made the deep background very soft due mostly to my choice of using the focal length of 200mm.

In this last image I’m doing a lot of backlit leaves…

f11.0 @ 1/80 sec., ISO 400; Lens @ 70mm
What attracted me to this scene was the contrast between the soft backlit leaves and the graceful, curving, dark branches of the tree. The nice thing about doing fall colors using backlight is that it can be done at just about any time of day.  Sometimes mornings are best, sometimes I use sunset and even noon time can work. It just depends on which direction the subject leaves are facing.

Hope you enjoyed my journey…’Til next week….

Author:  Jerry W. Venz, PPA Master Photographer, Craftsman
Training site: http://www.LightAtTheEdge.com
Client site: http://www.TheStorytellersUsa.com

Tuesday, October 17, 2017

THE DISAPPEARING FARMLAND IN IDAHO

When we arrived here, in Meridian Idaho in 2009, nothing was being built in Ada County due to the recession.  The tradesman we hired to build-out the retail space we leased for our new photography studio, The Storytellers, in Eagle were delighted for any work. What struck me the most when we got here was the refreshing mix of residential/commercial area with large tracts of farm or ranch land or open space with trees.  It was fun to speculate what crop the various farmers had planted as they were beginning to sprout.  The backyard at our home in Meridian backed up to a farm where there were always a few cows with their calfs grazing on the other side of our fence!  At our studio in Eagle, there was a family farm right across the street on the corner of Edgewood and State Streets.  We had a great view of it through our 12 foot picture window; the seasonal changes of that view, especially the fall colors and the winter snow, was delightful. Whenever I saw good clouds in the sky and the light was good I would go across the street and photograph the farm as it changed with the seasons.

This was one of my favorite views….
f14.0 @ 1/1000th sec., ISO 400
I really like these wood fences (typical here in Idaho) around the fields, and the small farm house with lots of trees; the dramatic Idaho sky helps, too.

Here’s the other side of the farm….

f11.0 @ 1/250 sec., ISO 400
This was done in late October about an hour before sunset.  Love those trees and clouds. That fence needed to be highlighted….

 f11.0 @ 1/200 sec., ISO 400
So, I moved closer and zoomed-in (lens @ 200mm) to catch the marvelous shadows being cast by the fence onto the grass.

Everything, in these previous images, is gone now…


I took this photo yesterday (10-14-17) from about the same vantage point as the first photo in this blog.  Typically when they “develop” farm land here in Idaho they level the field taking out all the fences and structures; that’s how we’re loosing all the old barns in Idaho. But, I still don’t understand why they also take down ALL the trees on a property; all the trees in the second and third images are gone. 

Sadly, this is happening all over Ada County. Since 2014 housing development and now apartment complex builds have skyrocketed. In 2016 building permits in Ada County leapt to 6,276 from the 1,648 in 2011. Here in Meridian permits went from their low in 2010 of 506 to 1,662 in 2016! 

Now I know why they have reported that Meridian Idaho is one of the fastest growing cities in the USA.  Big Whop!  

Nearly 40 acres of farmland in the USA is lost every hour—N.Y. Times

Yes trees will grow back eventually and people need some place to live, but they need to eat too and once concrete is laid over cropland it’s a historical fact that it never reverts back to cropland.  Such a shame…

’Til next week…

Author:  Jerry W. Venz, PPA Master Photographer, Craftsman
Training site:  http://www.LightAtTheEdge.com
Client site: http://www.TheStorytellersUSA.com

Tuesday, October 10, 2017

ACTION PHOTOGRAPHY -- SUBJECT’S SPEED VS. SHUTTER SPEED

I’ve been doing action photography for 40 years. Most of that was in the film era with everything in manual mode; most significantly our lenses were all manual focus! Many technical capabilities have changed, to our advantage, since we went digital.

— Shutter Speed:  Our old 35mm cameras were limited to 1/1000 of a second; today 1//8000 sec., is common.

— ISO Choices:  Our film limited us to 400-500 ASA—pushing to 1000 ASA had to be done at special labs; today the sky is becoming the limit.

— Manual Focus Lenses:  That’s all we had; today our auto focus lenses are superb giving us an amazingly high yield rate.

One of the most important things I learned, that has not changed, is to carefully plan my action images. Part of that planning is knowing what your action subject is going to do.  If I know where it’s coming from and where it’s going then I can place my camera in a great place to capture it in the proper place, compositionally, within the frame.

In this first example….

f6.3 @ 1/2000 sec., ISO 640
I wanted to catch this BMX Stunter with my camera in a vertical orientation and show the stand and street lamp (to indicate his altitude), as well as the horizon line of hills in the background. I did not pan my camera with his action, like I usually do; for this image I held dead-on to the compositional framing you see here and snapped the shutter as he flashed through the frame. This wasn’t really that difficult because his forward progress has slowed because he’s doing a 360 degree loop and I caught him at his peak altitude; he’s at 180° here and when he completes his rotation, wheels down, he’ll exit at frame left.

In this next image….

 f6.3 @ 1/2000 sec., ISO 500
For this image, since I just wanted to isolate him against the sky, I follow panned his run up the ramp, from camera right to left, and as he went airborne I froze his action at its peak with my fast shutter speed.

A Style Note on Shutter Speeds

My style or philosophy on capturing action is generally:

— For relatively slow moving subjects (like these bicycles or rodeo photography) I use Very Fast Shutter Speeds.

— For very fast moving subjects (like race cars and motorcycles) I use Slow Shutter Speeds.

Sounds counter-intuitive does it?

Well I found many, many, years ago that slow moving action subjects often look more interesting when frozen at peak action.  Whereas very fast moving subjects like race cars or motorcycles, on a road course, look very boring when frozen in place; it turns the race track into a parking lot!

Here is how I portray great speed….
f16.0 @1/15 sec., ISO 400
This fast action pan is pretty radical with my shutter speed at 1/15th of a second. You can see its effect on the front bike as we have some “jiggle-blur” because that bike hit some bumps on the track.  However, the effect of panning on the track and background is great and the isolation of the racers, as a result, leads your eyes to them.

The key to pulling-off good pans is to follow the action smoothly and to follow-through. You’ll get a better yield with high speed action pans if your shutter speed is a little faster—say 1/30th or 1/60th of a second.

How about a fast moving stationary subject?
f11.0 @1/30th sec., ISO 400
This image at the Western Idaho State Fair of an antique steam engine driving belted pulleys to a pump is a fast mover and yet is just sitting there! So, I used a slow shutter speed to make the large flywheels mostly clear to reveal the crank, rods, and belts working between the wheels. Then in post I did some tone mapping and converted the image to Black and White.

Now in this final image the dragster is not going super fast, but it’s not slow either….
f11 @ 1/500 sec., ISO 400
This image of the legendary Chi-Town Hustler, funny car, at the Fremont Drag-strip was done at a medium shutter speed because when a dragster is doing a long burn out, like the Chi-Town Hustler was famous for, it’s not moving at race speeds because it’s literally spinning its tires!  My goal was to freeze all that nice back lit smoke with the funny car at the head of its’ rocket like contrail.

Technical Note:
The first two images, of the BMX stunter in the air, were done with the auto focus, on my Canon 70-200mm f2.8 lens, in the AI Servo AF Mode. This mode is for moving subjects when the subject’s distance keeps changing. As you hold down the shutter release halfway the subject will be focused continuously.  The AI Servo AF Mode is simply fabulous! I wish I had this technology 40 years ago; my yield doing action photography would have been dramatically higher.

So, any of you out there reading this, try some radical, slow shutter speed, pans of a fast mover and show me your results,  Have some fun!

’Til next week….Don’t hesitate to ask question….

Author:  Jerry W. Venz, PPA Master Photographer, Craftsman
Training site:  http://www.LightAtTheEdge.com
Client site: http://www.TheStorytellersUsa.com

Tuesday, October 3, 2017

ARTISTIC INTERPRETATIONS IN THE DIGITAL DARKROOM

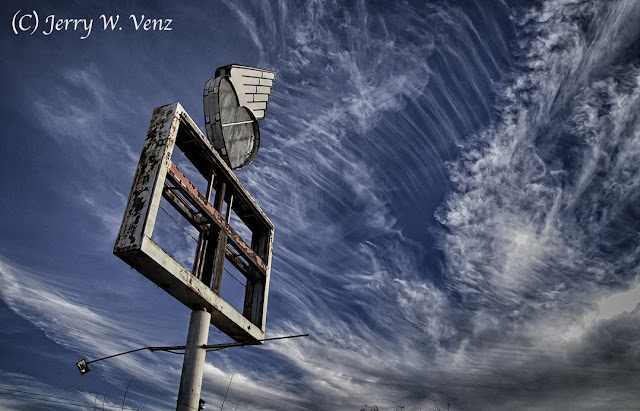
It’s remarkable what we can do with an image in five minutes with Photoshop as our darkroom (or the “dim room” as a fellow photographer coined it). In this example I did both a Black & White and color interpretations of an image spending 5 minutes on each version. In our wet darkroom days this would have taken a whole weekend setting up for B&W and then color in my home darkroom.


This color version was done using Nic’s Single Image Tone Mapping in Photoshop. This program is really great for pulling out detail in clouds. In fact you have to be careful because some of the tone mapping presets will easily overdo the detail rendering one of those wildly over the top images we see so often on the internet.

Typically I’ll quickly sample each preset until one gets close to the look I want—on this image I chose the Sinister preset—and then I manually adjust most of the sliders until I’m happy with it. Since Tone Mapping often introduces noise along with its effects I finished with noise reduction—for this image I used Luminance noise reduction in Camera Raw.

Not bad for 5 minutes work; here’s the original file….

f5.6 @ 1/800 sec., ISO 400; Lens @ 17mm
Then bringing this original into Nic again….how about a B&W version! When I took this image I saw this as a B&W art piece. So, I put this file into Nik Silver Efex Pro2; my favorite B&W conversion program.


So, to make this quick I scroll through the 38 presets until I find one close to my vision of this image as a black and white. I settled on: 024-Full Contrast and Structure and then did some tweaking in Camera Raw afterwords.

The only problem with Photoshop, not to mention the many plug-ins available, is reaching that point where you are satisfied.The danger is spending as much time in the “dim room” on an image as we did in the wet darkroom! I hear photographers, way too often, saying they spent 20 hours + working on some landscape image.  It maybe that many photographers these days don’t know what they want when they make the original exposure. 

Have Ansel Adams' Lessons on PRE-VISUALIZTION gone out of style? Or are his views on art and crafting the fine art print no longer relevant?  I hope not…

’Til next week….

Author:  Jerry W. Venz, PPA Master Photographer, Craftsman
Training site: http://www.LightAtTheEdge.com
Client site: http://www.TheStorytellersUsa.com