Tuesday, November 25, 2014

REAL NATURAL LIGHT PORTRAITS

I NEVER add light to my outside portraits unless it's past sunset. There's always plenty of light (usually too much light) one or two hours before sunset.  So, my goal is to find natural features, on my locations, to subtract light from one side to create a three dimensional quality to the portrait. Sometimes I use my Gobos--42" Black "flags" to block light when there's no natural alternative.  With the subtractive lighting technique you can create beautiful true natural light portraits; never needing so much as a reflector and most certainly NEVER polluting the scene with flash!

I tell my students, "If you think you need a reflector or flash then you have placed your subjects in the wrong spot!" 

The following set of images, from one of our recent fall family sessions, illustrates the subtractive lighting technique, my use of background light, and my use of relatively wide apertures with the longest focal length I can use given the constraint of the location.
f5.6 @ 1/160 sec. ISO 400, lens at 175mm


That big rock is perfectly placed for this time of the year!  The sun is setting behind it, giving me great back light.  There's a big patch of sky on the right--my key light. But, what makes this spot great is the row of trees on the left blocking the sky light on that side. Without those trees, subtracting that sky light, the lighting here would be flat, directionless and boring, creating, flat, two-dimensional people.


Both Images at f4.5 @ 1/200 sec., ISO 400, Lens at 200mm     
Then we moved to another favorite spot where I could seat my subjects.  This spot, again, has great back light, a patch of sky on the right, and the trees on the left blocking some skylight.  Their shadow side is more subtle here because there is also skylight coming from behind camera position.  For individuals I usually use a wider aperture and zoom to 200mm to create a nice soft background.

Both Images at f4.5 @ 1/200 sec. ISO 400, Lens at 200mm
Changing my camera position, in the same location, I made the backgrounds different for each of the kids.


Then we finish-up with a portrait of mom and dad. Backing off as much as I could (there's a large pond behind me) with  my lens at 168mm you can see why I like this spot. That big rock and old tree on the ground could not have been placed better for portraits!  The we moved to another favorite spot where I could seat my subjects.  This spot, again, has great back light, a patch of sky on the right, and the trees on the left blocking some skylight.  Their shadow side is more subtle here because there is also skylight coming from behind camera position.  For individuals I usually use a wider aperture and zoom to 200mm to create a nice soft background.
As usual, should you have questions please don't hesitate to drop me a note or make a comment.

Author:  Jerry W Venz, Master Photographer Certified
Training site:  http://www.LightAtTheEdge.com


Tuesday, November 18, 2014

BEING CREATIVE BY NARROWING YOUR VISION! Part 2 of 2

The amateur, and especially the tourist doing travel photography, will often take the wide view showing the whole subject and move on.  While that's fine, as an establishing image of where you were, it should only be the a starting point of discovery about your subject. To travel thousands of miles, spending lots of money to get there, and only do that snap-shot, that every other tourist does, is sad.
Lens @ 19mm
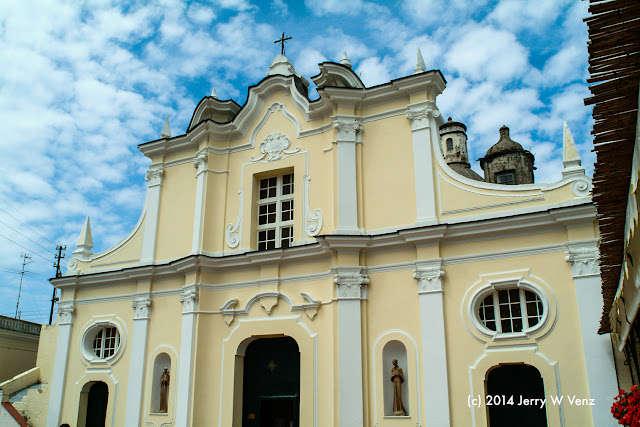
Here we are on the Isle of Capri, Italy; home of this beautiful old church (Santa Sofia, 1510). This is the view that all the tourists were taking--and it's OK. We had a great sky and I got as much of the church as I could with my lens at 19mm--the very narrow streets prevented me from backing up any more!

Lens @ 66mm


Moving to the left side of the church I see that the front is a facade build-on to the ancient part of the church!  So, zooming in and changing to a vertical position I could frame the old with the new parts of the church.  This tells the story of the church in Layers.  Oh, and the clock was still working!


Lens @ 35mm
A difficult image to get--the whole ship and from a nice elevated angle.  In a very rare situation I photographed this Princess cruise ship that we had sailed on in the past--from the current Princess ship we were on.  It just showed up in port and parked behind us!

While it's probably the best photo I've taken of a whole cruise ship I would not put in on my wall--it's a "Record Shot."

To create something more artistic you need to use a part of the ship (foreground) against some interesting environment (background) and make them a nice composition.


You don't even have to show much of the ship.  Here I implied it in silhouette, exposing for the sky, with people looking to the sunrise. This would go great on the wall--Large.

I'll say this again…don't be that safe, distant, observer!  Go beyond the "record shot" and show a different point of view.

Don't hesitate to ask questions or make a comment. 'Til next week…

Author: Jerry W. Venz, Master Photographer, Certified
Training site:  http://www.LightAtTheEdge.com

Tuesday, November 11, 2014

BEING CREATIVE BY NARROWING YOUR VISION! Part 1 of 2

Narrowing your vision is simply looking for the details by going in close.  But, it's not just the mechanical act of zooming-in with your lens--it's a way of seeing.

Become more than a distant observer; you must journey into the scene like a detective looking for clues. You may get dirty. You may get scratched-up in the under-brush or get wet, but the results are worth it.

Speaking artistically, when I see an image showing a wide overall view of something, especially a well known landmark, I usually loose interest after 3 or 4 seconds.  But, details not seen before are worth close scrutiny and often hold-up longer on the wall as art. 

You can learn so much more about something when you zoom-in close that I tell my students, "Narrow your vision; when you show less you can reveal more!"
 f5.6 1/1250 sec., ISO 400, Lens @135mm


 So, what's more interesting--the forest or the leaf? This forest view is what I see most amateur photographers do as distant observers--safe.  It's the image you get when you pull over at the "Scenic View" turnout.


Lens @ 24mm


If you're going to photograph a tree you need to, again, show a different point of view. I decided to show this tree from the point of view of a leaf!  I am standing on a six-foot ladder (I'm 6'2" ). I got this great overhead view and using my lens at 24mm. It felt like I was really up in the tree.


One of my favorite things to photograph here in Idaho: Freezing Fog! This stuff is amazing! I saw my neighbor's bush across the street with the morning sun behind it and took this image. Nice icy tendrils--a nice record shot..but, upon closer examination….

 f5.0 @ 1/2000 sec. ISO 125 @ 70mm (macro-mode)


All the remaining leaves on the bush were beautifully edged in ice crystals! I switch to MACRO mode to capture one of these tiny leaves (about 1 inch long) up close. Since there was a lot of light and I wanted a shallow depth-of-field I dropped the ISO low, opened up to f5.0 giving me a high shutter speed, which helped because it was windy and I was hand holding.  This image is in my fine-art portfolio and, of course, the bush is not! 

So, don't be that safe, distant, observer! Get in there, get on your knees, get dirty and show the world a different point of view.


Next week I will explain how you can translate this information to your travel photography. As usual, don't hesitate to drop me a line if you have questions or comments. 

Author:  Jerry W Venz, Master Photographer, Certified
Training site:  http://www.LightAtTheEdge.com

Tuesday, November 4, 2014

CREATIVE HIGH I.S.O. IN THE STUDIO

I keep hearing "experts" on the forums telling other photographers to ALWAYS use their camera's "native" lowest I.S.O.--usually somewhere around ISO 100.  Bad advice! If you have a late model DSLR with an APS-C size sensor or ANY full-frame sensor you will be giving up HUGE creative potential if you slavishly follow that advice.  I very rarely go down below 400 ISO when I'm outside and my starting ISO in the studio is 200. Why you ask, am I up at 200 ISO in MY studio?  simple, now that I'm not tied to any particular film's ISO I'm FREE to use ISO as a tool to get me to the f-stop/shutter speed combination I need for a given subject or creative idea.

So, here's my rule for picking ISO in the studio: THE F-STOP YOU REQUIRE FROM YOUR WEAKEST LIGHT DETERMINES YOUR ISO IN THE STUDIO--PERIOD.

In my studio the ceiling mounted "hair-light", which shares my Norman pack, with two other heads that are lighting my background, is my weakest light.  To get f11.0 from that light at full power requires ISO 200. It's that simple; my starting studio ISO is 200.

As an example of creative use of ISO in the studio I decided to do something different with an image of one of my older cameras I had up for sale. I placed the camera in front of one of the art prints that had been done with that camera. I loved the wild red sunset as the camera's background.

f22.0 @ 1/5th second ISO 800 - Lens at 82mm
 I used standard product lighting; a strip soft box (Larson 9"x24") overhead skimming the top of the camera (aimed towards me) and a kicker light (with a grid) on the right. In addition I had a reflector in front of me to bounce light back into the front of the camera--standard set-up; Boring… Hey, I though, what would it take to make it look like that red from the background was being projected through the camera's viewfinder and out the lens?  The "quick and easy" answer was my red LED,flash light of course!  The first thing to go was the front reflector, since it put too much light on the front of the camera and the lens.  My flash light has one red LED surrounded by 5 white LED's.  I knew I'd have to "drag my shutter" (go to a long shutter-speed) for this wimpy light to show-up on this mixed studio lighting scenario.  So, finally with my flash light, as close as I could get it, shining onto the front of the camera's lens--the red in the lens got really good when I upped my ISO to 800 with my shutter speed at 1/5th of a second.  With my ISO upped to 800 I had to stop my lens down to f22.0 because the overhead studio flash was already at it lowest power setting.

The basic rule here is that the shutter speed exposes for the continuous light (the flashlight) and the f-stop exposes for the flash; simple.  Anyway, I did sell the camera!  And I ended up with this nice image to illustrate high ISO and mixed lighting in the studio.

As always, should you have questions please don't hesitate to drop me a note.

Author:  Jerry W. Venz, Master Photographer, Certified
Training site web address:  http://www.LightAtTheEdge.com