Tuesday, December 26, 2017

A PRO’S PROCESS FOR BARN PHOTOGRAPHY AS ART; Part 1

I think that within 10 years most, if not all, of the barns here in the treasure Valley (Idaho) will be gone. It’s no wonder with the development boom in Boise, Meridian, Eagle, Star and Nampa that has accelerated since 2015. I’m glad I started my documentation of these old structures in 2010, since we’ve been loosing 2 or 3 barns a year in our area.

So, the barns I’ve been documenting have been those with encroaching housing subdivisions nearby. I know the barn’s days are numbered when they stop planting any crops on the property. Then they often tear down the farm house and put up the for sale sign and I know the clock is ticking.  The reason I watch for all of these “signs” is that I’m not merely “documenting” these barns—my goal has been to create barn photography as art. It takes time to artistically capture any of the outdoor structures (manmade or natural) that I focus on. 

Here are my criteria for how and when I will bring my camera to bear on an outdoor subject:
  1. Which Direction is the Best “side” of the subject facing relative to the sun? In other words what is the barn’s best side and when is the sun going to be in the position to give it directional lighting.  That is lighting that will create shadows and bring out the details in the barn’s wood—I avoid  flat lighting in most cases.
  2. With my subject’s directional face known then I know if my barn is going to be a sunrise or sunset subject.  Then I have to see what time to start photography. Just knowing these first two criteria may take several visits to the site.
  3. Next I decide if I want to include the crop (if they’re still planting) in the foreground for the overall portrait of the barn. Depending on the crop it may obscure this view of the barn.
  4. Finally, if it’s a large barn I’ll probably want nice clouds since with a large view there’s always a lot of sky.
This barn illustrates my criteria….
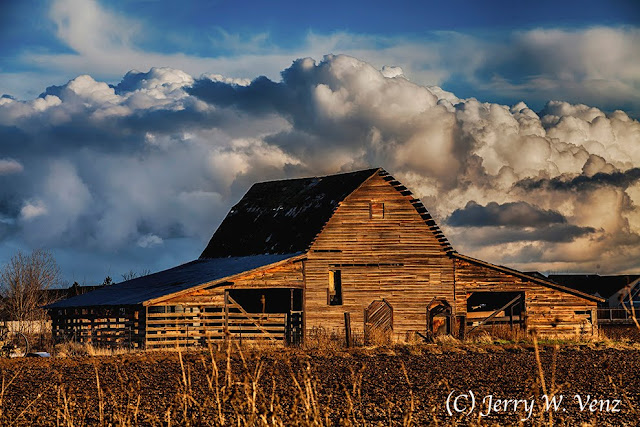

 f10.0 @ 1/400 sec., ISO 400; lens @ 160mm
  1. This barn’s best side is facing West; look at all that great detail!
  2. So,  I needed to use the setting sun that still gave me the shadows at the “A” frame of the barn’s roof; this worked out to be about 5pm in December.
  3. They had been planting corn in this field and that meant this view of the barn would not be possible with a crop of corn seven feet high.
  4. The Big issue for me was getting a nice big cloud structure behind that big barn.

It took two years for all these criteria to coincide for this barn’s portrait. Why so long you ask? Well, I’m a full time professional photographer and my paying clients come first. That means that my outdoor family portrait sessions usually happen one or two hours before sunset—and that’s also prime barn photography time. 

Back to this barn….

f10.0 @ 1/400 sec., ISO 400; lens @ 150mm
After I get the overall view I start slicing-up the barn into detail images. I love the shadows here that create the three-dimensionality necessary to create textures and the drama that we as artists should seek.

Flash forward almost two years….

f16.0 @ 1/250th sec., ISO 400/ Lens @ 75mm
This barn is still standing and I finally decided I wanted a corn crop in the foreground! Of course, they had planted other types of crops in the intervening years—so, I had to wait for the corn crop (again!). Drat those Idaho farmers and their pesky crop rotations—guess they know what they’re doing!

This is the image I had pre-visualized.…

f16.0 @ 1/250 sec., ISO 400; Lens @ 123mm
Love the corn reaching for the barn…and that great shadowed texture on the face of the barn, with nice clouds behind it. And lastly a B&W conversion to make the scene really dramatic.  I used one of my favorite B&W conversion plug-ins—NIK, Silver, Efex Pro 2 using the fine art process preset (with my changes to taste) and an overlay of one of NIK’s film types. In this case I used their T-Max 100 film emulation

Next week I’ll continue with this topic showcasing other barns in my quest to create art and preserve some history.

Always open for questions….’Til next week…

Author:  Jerry W. Venz, PPA Master Photographer, Craftsman
Training site:  http://www.LightAtTheEdge.com
Client site: http://www.TheStorytellersUsa.com

Tuesday, December 19, 2017

B&W vs COLOR WHEN AND WHY THIS PRO CONVERTS

I love really powerful B&W images. Like a lot of young photographers in the 1970’s I learned the art and craft of photography in a home darkroom hand processing 35mm film and then printing my own B&W prints. I studied the work of Adams and Weston and, my favorite to this day, W. Eugene Smith. But I also love the color work of Pete Turner. It was his influence that led me to do color printing using the Cibachrome process. My philosophy is—if you’re going to do color—do color big time!

Too many photographers today use B&W as a fall-back, thinking well if it does not work in color I’ll convert it to B&W.  It’s just too easy today to convert so the thought process about color vs B&W at the point of clicking the shutter is gone! In the film era we planned in advance (remember Ansel Adam’s pre-visualizations?) what our final image was to look like. If I had a subject in mind that had to be in color I loaded-up Kodachrome or Ektachrome because I was going to print it on Cibachrome. That same thought process applied to B&W; except I had far more choices in B&W paper to choose from.

So, lets look at a couple of different subjects and my thought process on color vs B&W in the digital age…
f18.0 @ 1/4 sec., ISO 400
When I walked-up to this plant (Canna Durban) I already knew that color was its most compelling feature. That is what drew me to it from over fifty yards away!

Here it is in B&W…

I converted the image using the NIK, Silver Efex, Pro 2 plug-in. While this B&W rendition is graphically pleasing it just does not tell the viewer what makes this plant special—its colors!

For this next subject I’ll start with he straight-up color version of reality….
 f11.0 @ 1/400 sec., ISO 400
Now this color version has the nice lighting skimming the old barn’s face as the sun is setting, but the scene is just too pretty.  When I first saw this place (a rock quarry) I thought those long slabs of rock on the ground looked like coffins.  So, I decided pretty wouldn’t do I wanted creepy


So, I chose to process this image using HDR, Efex, Pro 2 — tone mapping/single image—using the B&W Art preset.  Then as usual I modified most of the settings to get more texture in the barn’s wood and drama in the sky.

Now the scene has the creepy drama I had in mind when I first saw it.

While it’s a lot easier today to go from color to B&W and we now have an infinite variety of ways to modify an image with software and plug-ins we, as artists, must sill have a vision of what we want to say to our viewers and clients.  Merely producing “pretty pictures” of things exactly as they are, using a point of view that any amateur could do, won’t get you noticed as an artist.

I alway entertain questions….’Til next week….

Author:  Jerry W. Venz, PPA Master Photographer, Craftsman
Training site:  http://www.LightAtTheEdge.com
Client site: http://www.TheStorytellersUsa.com

Tuesday, December 12, 2017

OUTDOOR PORTRAITS USING SUBTRACTIVE LIGHTING

There’s simply no better way to create portraits outdoors than with natural light. And, there’s no better method to create dimensional—that’s three dimensional—directional lighting (with shadows!) than by using the Subtractive Technique.

This technique is very simple. When your subject is in an outdoor environment that has flat light—like open shade—or out in the open with light striking the subject from all sides, you need to subtract the extra light from two sides (or at least 1 side) to create a nice shadow side on your subject’s face.

One of our tools to create subtractive lighting is an Opaque Black Flat, which we call a GOBO or flag—terms I learned many years ago when Kathi and I were doing independent short films. We also use natural gobos on location to create the same effect; especially with group portraits. A natural gobo can be a line of trees , a large bush, or rocks. Anything that will create a shadow side on your subjects face(s), when you place them close to that gobo, is the goal. If you don’t see any shadows then, at that point, your gobo has become a reflector and will defeat our purpose.

Here is an example using the natural gobo technique…

 f4.5 @ 1/400 sec., ISO 800; Lens at 200mm
I placed the boy close to a bunch of trees at camera left.  The sun is setting behind him and it’s about an hour before sunset. The key light is a huge patch of blue sky (the sky is my soft box!) on the right.  The key to creating this light pattern is being able to SEE the shadows and the direction of light outdoors. I think that the reason so many photographers resort to using flash outdoors is that they can’t see the sometimes subtle difference when the subject is placed next to a gobo.

One of the most difficult times to create and see when the light is good outdoors is in fully overcast conditions.  This is when we bring out our 42” black gobo to break-up the very flat light….

f4.5 @ 1/400 sec., ISO 400; Lens @ 200mm
This was done at noon on a very overcast day, in the California wine country, where I was teaching a class to professional photographers on this very topic. Because I liked that fence I sat her on the ground; it also gave her something to lean against. Since that overcast sky gave her severe “raccoon eyes” I stood over her (which also gave me a clean background) and had her bring her chin UP until I saw the light in her eyes. Then I had one of my students bring the 42” black gobo in close to her on the right side creating that nice shadow—and the three dimensionality that the flat overcast sky would have ruined.

In a bright sunny situation with again flat light—because there are no natural gobos—we use the hand held gobo like this….

This was done at an hour and a half before sunset with the subject’s back to the sun. We placed him on a picnic table completely in the open with light striking him from every angle—not the ideal subject placement! So, I had Kathi bring the 42” black gobo Close and angled over his head to block the top light and light from the right.

I learned this powerful yet simple technique over 30-years ago from the master of Subtractive Lighting Leon Kennamer. Leon would usually use two gobos—one horizontally over the subject’s head and the other vertically on one side creating a half-box.  However, he did suggest this single, angled, gobo technique when we didn’t want to set-up stands in a windy environment.

So, as you can see there’s no need what-so-ever for flash outside if there is light—in evidence. The key is not just the light—anyone can see light—it’s all about seeing or creating the shadows to give our subjects natural dimension.  

Don’t just be a strobist—be a portrait artist!

As usual I am open to questions….’Til next week…

Author:  Jerry W. Venz, PPA Master Photographer, Craftsman
Training site: http://www.LightAtTheEdge.com
Client site: http://www.TheStorytellersUsa.com

Tuesday, December 5, 2017

A MASTER PHOTOGRAPHER’S VIEW ON LIGHT; Part 2

As photographers we use our camera to create images that transform three-dimensional objects, in the real world, into a two-dimensional facsimile that we then output to yet another two-dimensional medium—the print, a computer monitor, cell phone, or the like.  It’s out job to recreate the illusion of three-dimensionality in these two-dimensional media, before the image is captured, with the use of dimensional lighting. That is lighting that is Directional—and that means any one direction other than from camera position. It’s that simple.

In Part 1 I mentioned the great classic painters who perfected the art of realistically portraying the world in three-dimensions; and the modern cinematographers who studied those classic painters. I encourage you to check out my list of truly great cinematographers—study their films!

STUDIO LIGHTING—PORTRAITS:

Oddly some of the worst lighting I see these days is by studio photographers.  It’s ironic because studio portrait photography hit its zenith in technique and gained world wide fame in the 20th century from the masters I studied like Yosef Karsh, Aronold Newman, and George Hurrell.  Don’t photographers today study these masters?

What I see way too much are portraits using flat lighting—as though the photographer was going to photograph a postage stamp collection. Flat Lighting is fine if your subject has only two-dimensions.  Otherwise, there’s no excuse for flat lighting in the studio!

It’s in the studio where we have TOTAL CONTROL of both light and camera placement.  In the studio we are God—saying, “Let there be Light” exactly where we want it!

It’s all about direction….

F11.0 @ 1/200 sec., ISO 200
Depending on how many subjects are in the front of my camera my main light is placed at 7, 8, or 9 o’clock when on the left or the reverse 5, 4, or 3 o’clock when on the right.

For this little girl’s portrait I had my main light close to the 9 o’clock position with a soft white reflector at the 3 o’clock. No other fill was used.

NOTE:  The key to directional lighting is to not ruin it with fill light.  I never us a fill light in my studio--not even with groups!

Here’s my basic studio set-up….


That main light, on wheels, is a 7-foot OctoDome by Photoflex; nothing “wraps” better than a large soft box.

And a ballerina on that background….
f11.0 @ 1.200 sec., ISO 200
For her portrait I had the main light at 9 o’clock with it feathered away from the background. No reflector or other fill was used. The “hair light” was left on to light her raised foot.

Showing how a large main light will “wrap” on a group….
This portrait was a Professional Photographers of America International Print Competition Loan Collection Winner in 2014.
In this portrait I placed my main light on the left at about the 7 o’clock position—just out of my camera’s view. I did use a soft white reflector on the right at the 3 o’clock position.

Another Leonardo da Vinci quote:

“The Artist who can make his subject appear to be in the relivo (made to appear to have elevation, with depth and dimension) is he who should receive the greatest praise.”

So, go forth fellow photogs. and work on your “relivo”!  ’Til next week….

Author:  Jerry W. Venz, PPA Master Photographer, Craftsman
Training site: http://www.LightAtTheEdge.com
Client site: http://www.TheStorytellersUsa.com

Tuesday, November 28, 2017

BLOG #200 - A MASTER PHOTOGRAPHER’S VIEW ON LIGHT; Part 1

The single most important quality of light is its direction. After you’ve acquired or created direction everything else is easy. This applies to still photography, cinematography, or traditional two dimensional arts as well. 

I didn’t just make this up or invent it—I learned it over my forty-plus years as an artist by studying those aforementioned two dimensional artists—the classic painters—and the great cinematographers who studied those same painters.

My favorites include:  
  • Johannes Vermeer, the 17th century Dutch master, who did brilliant portraits of ordinary people by window light (see his: “Woman Holding a Balance” and “Girl Interrupted at Her Music”).
  • Michelangelo Caravaggio, the Italian Baroque painter. His works using strong directional natural light are stunning (see: The Calling of Saint Matthew”).
Many of the great cinematographers have also studied these and other painters for inspiration. If you want to learn lighting I suggest your study the work of great cinematographers like: 
  • Freddie Young (Lawrence of Arabia, Dr. Zhivago, Ryan’s Daughter)
  • John Alcott (Barry Lyndon)
  • Jordan Cronenweth (Blade Runner, Altered States)
  • Frank Tidy (The Duellists)
  • Andrew Lesnie (Lord of the Rings)
These are just a few truly great photographers I’ve studies over the years; there are virtually no, living, still photographers I can suggest to study today.

The basic rule for Directional Lighting.
  • Your light’s direction should be coming from any direction other than camera position.
  • Light coming from camera position will be flat light and flat directionless light is death to three dimensionality and texture because it erases shadows. 
Note:  This applies to photography of any type of subject (people, places or things) if you want it to appear three-dimensional; from landscapes to product photography, baby portraits to weddings, travel photography or sports coverage—they all need directional lighting.

Leonardo Da Vinci wrote:  “The Artiste who avoids the shadows may be said to avoid the glory of the art.”

How to acquire or create directional lighting.

Inside Natural Light - Portraits:

Direction is created by placement of the subject relative to the Light source—when you can’t move the light source you move the subject.


Example using an open, standard, outside door….


 f3.5 @ 1/160th sec., ISO 800; Lens @ 120mm
I picked this spot for her bridal portrait because all the light sources in the room had great direction. The key light—the open door—is very directional and soft (the source is larger than the subject making it nice and soft). The background is lit with both overhead floods and some window light giving the background a warm glow. I placed her about six feet from the doorway and had her rotate bringing her right shoulder towards the camera. Then I had her bring her nose towards the light just enough to get light in her far eye.

Inside Natural Light - Immovable Object:

Here direction is created by Camera Position relative to the light source.

Example using a large, natural light, opening….


 f4.0 @ 1/60 sec., ISO 400; Lens @ 84mm
In the ruins of Pompeii (Italy) you can’t move anything! When I happened on this scene all the tourists were taking their pictures at the opening you see on camera right—giving them flat, boring light. So, I circled around, 90 degrees, from the opening finding a 5 1/2’ tall wall.  Looking over the wall I saw the scene bathed in great directional light creating gorgeous texture and shadows! So, placing my camera on top of the wall, and on my tiptoes, I created an image nobody else even saw!

Inside Natural Light - Landscapes:

Here direction is again created by camera position; most nature/landscape photographers know this (even the amateurs usually get this right!) unlike a lot of so-called professional portrait and wedding photographers.

Example using dramatic, back-side, lighting…

film: Kodaochrome 64; lens: 16mm Fisheye
I placed my camera in this spot so that the background pinnacles would get that dramatic semi-back light; I like that half the pinnacles are in silhouette.  Moving in close to that large petrified sand dune (this is Arches National Park) and still getting such a panoramic view was possible because my lens’ angle of view is 180 degrees.

Example waiting for directional light….

f14.0 @ 1/500 sec., ISO 400; Lens @ 168mm
In the planning of this image my camera position was fixed because I wanted this composition. Therefore, I had to determine when this angle of view of the barn would get good directional light.  Is it at sunset or sunrise and what month of the year would give me that light? I also had to wait for good clouds to complete the image I had pre-visualized.

As Ansel Adams said:  “You don’t take a great photograph; you make one!”

In Part 2 I’ll continue my lesson on the creation and use of directional light in the studio. ’Til next week…

Author: Jerry W. Venz, PPA Master Photographer, Craftsman
Training site:  http://www.LightAtTheEdge.com
Client site: http://www.TheStorytellersUsa.com

Tuesday, November 21, 2017

TRAVEL PHOTOGRAPHY AS FINE ART - PART 2


When in Rome….get a hotel room within walking distance to your main subject locations! I went out at 6pm—two hours before sunset—to photograph some of Rome’s iconic features.  The Colosseum was a total zoo; hundreds of tourists and tour busses disgorging more tourists! So, I walked to the Arch of Constantine seeing great light crossing its surface….


f9.5 @ 1/250sec., ISO 400
Going for a different composition I zoomed-in and went vertical. I love that tree framing the arch. This also got rid of a lot of tourists!

Don’t forget the details….

 f11.0 @ 1/250 sec., ISO 400
On the other side the arch was getting great light skimming its interior. So, I zoomed-in for this close-up.  

I did the short hike to Palatine Hill and was rewarded with very few tourists! This was one of my favorite compositions….

 f13.0 @ 1/350 sec., ISO 400; lens @ 24mm
I love how that tree fit the arc of the arch. However, to get the tree there I had to move in close to the arch and use my lens at 24mm causing a lot of distortion on the arch. Hurray for Photoshop’s distortion correction feature!

Five days later we did a day trip to the classic site at the top of my list….Pompeii.  We got there at 10am and had good light and nice clouds in the sky. It turned out that a lot of the best features in Pompeii were interiors so, time of day wasn’t as critical as the landscapes. Case in point….


 f9.6 @ 1/60 se.c, ISO 400; lens: 20mm
This is a section of a round room with a large open, round, skylight. I love the soft light and the mysterious shadows in the alcoves.

When the light outside isn’t so good...


 f4.0 @ 1/60 sec, ISO 400
Change your camera position to get good directional light (with shadows!). The tourists were taking their pictures from the opening of this structure on the right. All that give them was flat, boring, shadowless lighting.  I moved 90 degrees to the other side where the light was creating really nice textures and produced the three dimensionality due to the shadows.

When outside this is what I’m looking for….

f19.0 @ 1/180 sec., ISO 400; Lens @ 24mm
The morning sun at 10am was just high enough to light over these low walls and yet give me good shadows to create texture and dimension. In addition, a bonus, I had good clouds!

TIP:  In an image with foreground objects (those pots) leading into a lot of mid-ground and background detail I want maximum depth-of-field. For this image I had my aperture set to f19.0 using my 24mm lens.

In a future blog I’ll share some fine art photography from our travels in Mexico and the Caribbean.

’Til next week….

Author:  Jerry W. Venz, PPA Master Photographer, Craftsman
Training site: http://www.LightAtTheEdge.com
Client site: http://www.TheStorytellersUsa.com

Tuesday, November 14, 2017

TRAVEL PHOTOGRAPHY AS FINE ART - PART 1

As a professional, travel photography is always about fine art for me. If I don’t have great lighting—preferably directional—or compelling composition I can create or a really different point of view, I usually pass on that subject. I may revisit the subject at a different time of day if I think the lighting will be better.

The point is I don’t just capture images of what’s in front of me to get an image—I don’t do “record shots”. With this philosophy it means that I don’t blow through hundreds of locations in a few days (remember the movie, “If this is Tuesday it must be Belgium”!). So, the tour bus method of visiting iconic subjects is out of the question if you want to create art on your travels. Therefore, I limit how many locations I’m planning to photograph. I pick a hotel close to my subject locations so I can walk to them. That makes it easy to revisit those locations if I decide sunset lighting is better than sunrise lighting for the subject. 

For example, having planned on a hotel to get the view of the famous Faraglioni Rocks—on the Mediterranean side of the Isle of Capri, Italy—it was easy to create the image I had in mind.

f16.0 @ 1/125sec, ISO 400
I just didn’t know the best time of day for this view of the rocks until we checked into the hotel. I was hoping for some nice direct sunset lighting on the rocks, but for this time of year (early May) it never happened. So, it became a sunrise image; had to get up at 5am and set up my camera position on the roof of the hotel for this marvelous view.

Another sunrise image from Capri…

f11.0 @ 1/250th sec., ISO 400
Since I wanted this offset composition, with the house on the cliff to the right, it was vital that I have nice clouds in the background.  

NOTE: In general, when doing landscapes, if I don’t have good clouds in the sky I pass on the scene until I do get some clouds.  And I know you can add them in post, but it's just not the same.

I’m always looking for directional lighting that will show texture and create shadows. In this next image I found it on an interior….

f8.0 @ 1/125 sec., ISO 400
This is an interior view of one entryway at the ruins of Villa Jovis, Emperor Tiberius’ Palace on Capri. I guess this was the ancient Roman’s way of making “exit” lights over doorways!

 f4.0 @ 1/30 sec., ISO 800
Downtown Capri’s old clock tower building strung with lights over the outdoor seating for their restaurants was a must do image.

TIP: I did this at dusk just after sunset—so the lights would show-up, but the sky would still have color. Photographing at dusk means that you don’t need a tripod; you merely have to bump up your ISO (800 in this image) so you can hand hold your camera.

With my artistic photographic background rooted in the black and white darkroom I’m always looking for color images to convert to black and white. So, when we walked through Capri’s yacht harbor I was especially vigilant for some artistic compositions of the boats on the water.

f16.0 @ 1/250 sec., ISO 400
This was a natural for B&W conversion. I especially like how the water renders in B&W.

TIP: One of my favorite B&W methods of conversion is with NIK’s, Silver Efex Pro2, plug-in for Photoshop. 

In Part 2 we’ll go to Rome and Pompeii to create some fine art images…’Til next week…

Author:  Jerry W. Venz, PPA Master Photographer, Craftsman
Training site:  http://www.LightAtTheEdge.com
Client site:  http://www.TheStorytellersUsa.com

Tuesday, November 7, 2017

AS FALL ENDS PHOTOGRAPHERS FOLLOW THE LEAVES

We had a pretty early fall here in Idaho this year. Some of the trees turned completely the first week in October. Seeing that trend I was out hitting my favorite dozen spots for fall colors right away. 

So, now that it’s the first week in November fall is pretty much over and now I follow the leaves to my ground game! The basic rule with fall art photography is we look up—catching that great back light for fall colors at the beginning and then after the fall has happened then we look down for interesting leaf compositions on the ground!

I’m looking for colorful leaves on an interesting contrasting background like this….
f14.0 @ 1/250 sec., ISO 400; lens @ 48mm
When doing this style of photography I tend to stop down my lens—here I used f14.0—for maximum depth-of-field. With the leaves laying on the background you can’t knock the background out of focus without also making all the leaves soft as well. 

Whatever the leaves have fallen on is just as important as the leaves themselves…
 f13.0 @ 1/60 sec ISO 400; lens at 50mm
This rotted-out log was ideal as a natural container—after all the leaves came from this type of tree and now they’ve rejoined to fertilize the forrest floor.  Aside from that symbolism I like the contrasting texture of the log against the leaves.

And what did I say about the absence of backlight at ground level?
f8.0 @ 1/250 sec., ISO 400; lens @ 200mm
Sometimes we can make that happen with the proper placement of a favorite leaf!

What helped here was the very thick above ground root system that allowed me to place that leaf so it caught the light of the setting sun. So, the leaf got nice back light and the tree roots got a great skimming side light to show their texture.

So, now I’m looking forward to winter weather. The snow is nice, but what I really like to photograph is the freezing fog. The ice crystals, created by freezing fog, that cling to everything makes the outside world look like a huge Christmas ornament! My favorite time of year…

I’m open to questions…’Til next week…

Author:  Jerry W. Venz, PPA Master Photographer, Craftsman
Training site:  http://www.LightAtTheEdge.com
Client site: http://www.TheStorytellersUsa.com

Tuesday, October 31, 2017

SIMPLE B&W CONVERSIONS FOR DRAMATIC IMAGES

I like my B&W images to be very dramatic. If the color image I start with does not have dramatic lighting for texture or at least dramatic blacks with good contrasting whites then I leave it as a color image.

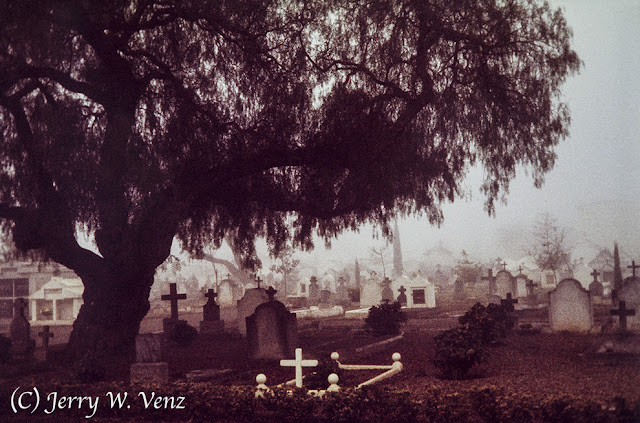
This first image conversion is from an Ektachrome High Speed Color slide from a cemetery series I did back in 1975.  I did not scan the slide to create my working digital file—I photographed it using my Canon 5D MKII using a macro lens. To see how I did it check out my YouTube video, Copying Slides and Negatives with a DSLR…you’ll find the link located at the bottom of the article.

Here’s the cropped B&W conversion….


For this conversion I worked with the 25.7MB RAW file in ACR (Adobe Camera Raw). Like all the other Pros on the web, I’ll warn you not to just de-saturate your file with that tempting slider, at the bottom, in ACR Basic; that’s a No, No!
  • Instead I use the HSL/Greyscale (it’s the fourth box over from the Basic box below the Histogram/data display)
  • Then you check the box—Convert to Greyscale
  • Now you’re in Greyscale Mix-Auto
  • Click on Default (next to Auto); I don’t do anything in Auto—I want total control of all values!
  • Now you have control of 8 - color sliders, from Reds to Magentas, giving you control of tonalities throughout the image.
Here’s my original color image….


Because I wanted this image to be grainy I used Kodak Ektachrome H.S. Daylight film and had it pushed to 1000ASA. This produced nice big grain, but also induced the brown cast in the slide that I never really liked.  So, 42 years later I have a B&W version of this image that I’m happy with!

For this next image we’ll start with a digital file from my old Fuji Pro S5 camera done in this century! Like last time here’s the end result…

This conversion was done using the ever popular NIK, Silver Efex, Pro 2 software. This is probably the easiest, and at the same time, really effective B&W conversion out there.
  • Once you open your file in NIK you have a Pre-set Library of 38 different styles of conversion to try out.
  • Then you can modify any selection with the color sliders or levels and curves.
  • Then you can go wild in Film Types—film emulation modes—where you have 18 film types to choose from.
  • In addition there are Global Adjustment sliders.
Here’s the original color file…
 f13.0 @ 1/400 sec., ISO 400; Lens @ 170mm
This was a nice vertical image in color, but I think the weeds were a distraction from the old barn wood when converted to B&W.

I tend to do a lot of cropping in post; when I see my images in two-dimensions I often see something I didn’t see on location.

Don’t hesitate to ask questions…’Til next week…


Author: Jerry W. Venz, PPA Master Photographer, Craftsman
Training site: http://www.LightAtTheEdge.com
Client site: http://www.TheStorytellersUsa.com

Tuesday, October 24, 2017

CREATE THE BEST FALL COLORS WITH BACKLIGHT!

I always look forward to our marvelous fall colors here in Idaho. After all Boise is called “the city of trees” for a reason. And not to be outdone the fall colors in Eagle, Meridian, and Nampa are always great as well.

My style of photography is different than the many photographers’ work I see on the web—especially those in the East—where they often do wide views of whole forests ablaze in fall colors. That’s OK if all you want is a “record shot” of fall colors, but those pictures usually remind me of the pictures amateurs take, at those tourist viewpoints, at the marked turn-outs along side the road at National Parks.

As artists I think we must delve a lot deeper into our subjects than the amateurs and tourists. I mean that literally when it comes to fall colors.


These are my techniques:
  1. I walk into the outer edge of the forrest looking for backlight.  If you go too deep into the forest you lose the backlight.
  2. This means that the sun must be visible; you’re not going to get good backlight on a cloudy day.
  3. I don’t use wide angle focal lengths. Most of the time I use my 70-200mm f2.8 zoom lens.
I’m looking for details like this….

 f11.0 @ 1/500 sec., ISO 400; Lens @ 105mm
This image with its crisp detail, due entirely to the strong backlight, speaks volumes about the nature of autumn.

NOTE:
  1. As seen in this image, I look for layers of leaves to create some dark contrasts within the composition. The silhouettes of the smaller leaves behind my larger backlit leaf creates that contrast.
  2. I’m also very aware of the background behind any subject I photograph. If I can’t get a near perfect background behind my subject (here I wanted a dark contrasting background) I simply move-on to another subject.
  3. I used f11.0 as my aperture here to create maximum sharpness in all these leaves knowing that my background would still be nicely out of focus (with nice bokeh) because that background is about 50 yards behind my subject.
In this next image I wanted a softer look….

f4.5 @ 1/500 sec., ISO 800; Lens @ 200mm
Here my tree is part of the background so to knock it out of focus I picked f4.5 as my aperture to give me just enough depth of field for my branch of colorful leaves in backlight. This made the deep background very soft due mostly to my choice of using the focal length of 200mm.

In this last image I’m doing a lot of backlit leaves…

f11.0 @ 1/80 sec., ISO 400; Lens @ 70mm
What attracted me to this scene was the contrast between the soft backlit leaves and the graceful, curving, dark branches of the tree. The nice thing about doing fall colors using backlight is that it can be done at just about any time of day.  Sometimes mornings are best, sometimes I use sunset and even noon time can work. It just depends on which direction the subject leaves are facing.

Hope you enjoyed my journey…’Til next week….

Author:  Jerry W. Venz, PPA Master Photographer, Craftsman
Training site: http://www.LightAtTheEdge.com
Client site: http://www.TheStorytellersUsa.com

Tuesday, October 17, 2017

THE DISAPPEARING FARMLAND IN IDAHO

When we arrived here, in Meridian Idaho in 2009, nothing was being built in Ada County due to the recession.  The tradesman we hired to build-out the retail space we leased for our new photography studio, The Storytellers, in Eagle were delighted for any work. What struck me the most when we got here was the refreshing mix of residential/commercial area with large tracts of farm or ranch land or open space with trees.  It was fun to speculate what crop the various farmers had planted as they were beginning to sprout.  The backyard at our home in Meridian backed up to a farm where there were always a few cows with their calfs grazing on the other side of our fence!  At our studio in Eagle, there was a family farm right across the street on the corner of Edgewood and State Streets.  We had a great view of it through our 12 foot picture window; the seasonal changes of that view, especially the fall colors and the winter snow, was delightful. Whenever I saw good clouds in the sky and the light was good I would go across the street and photograph the farm as it changed with the seasons.

This was one of my favorite views….
f14.0 @ 1/1000th sec., ISO 400
I really like these wood fences (typical here in Idaho) around the fields, and the small farm house with lots of trees; the dramatic Idaho sky helps, too.

Here’s the other side of the farm….

f11.0 @ 1/250 sec., ISO 400
This was done in late October about an hour before sunset.  Love those trees and clouds. That fence needed to be highlighted….

 f11.0 @ 1/200 sec., ISO 400
So, I moved closer and zoomed-in (lens @ 200mm) to catch the marvelous shadows being cast by the fence onto the grass.

Everything, in these previous images, is gone now…


I took this photo yesterday (10-14-17) from about the same vantage point as the first photo in this blog.  Typically when they “develop” farm land here in Idaho they level the field taking out all the fences and structures; that’s how we’re loosing all the old barns in Idaho. But, I still don’t understand why they also take down ALL the trees on a property; all the trees in the second and third images are gone. 

Sadly, this is happening all over Ada County. Since 2014 housing development and now apartment complex builds have skyrocketed. In 2016 building permits in Ada County leapt to 6,276 from the 1,648 in 2011. Here in Meridian permits went from their low in 2010 of 506 to 1,662 in 2016! 

Now I know why they have reported that Meridian Idaho is one of the fastest growing cities in the USA.  Big Whop!  

Nearly 40 acres of farmland in the USA is lost every hour—N.Y. Times

Yes trees will grow back eventually and people need some place to live, but they need to eat too and once concrete is laid over cropland it’s a historical fact that it never reverts back to cropland.  Such a shame…

’Til next week…

Author:  Jerry W. Venz, PPA Master Photographer, Craftsman
Training site:  http://www.LightAtTheEdge.com
Client site: http://www.TheStorytellersUSA.com