Tuesday, December 26, 2017

A PRO’S PROCESS FOR BARN PHOTOGRAPHY AS ART; Part 1

I think that within 10 years most, if not all, of the barns here in the treasure Valley (Idaho) will be gone. It’s no wonder with the development boom in Boise, Meridian, Eagle, Star and Nampa that has accelerated since 2015. I’m glad I started my documentation of these old structures in 2010, since we’ve been loosing 2 or 3 barns a year in our area.

So, the barns I’ve been documenting have been those with encroaching housing subdivisions nearby. I know the barn’s days are numbered when they stop planting any crops on the property. Then they often tear down the farm house and put up the for sale sign and I know the clock is ticking.  The reason I watch for all of these “signs” is that I’m not merely “documenting” these barns—my goal has been to create barn photography as art. It takes time to artistically capture any of the outdoor structures (manmade or natural) that I focus on. 

Here are my criteria for how and when I will bring my camera to bear on an outdoor subject:
  1. Which Direction is the Best “side” of the subject facing relative to the sun? In other words what is the barn’s best side and when is the sun going to be in the position to give it directional lighting.  That is lighting that will create shadows and bring out the details in the barn’s wood—I avoid  flat lighting in most cases.
  2. With my subject’s directional face known then I know if my barn is going to be a sunrise or sunset subject.  Then I have to see what time to start photography. Just knowing these first two criteria may take several visits to the site.
  3. Next I decide if I want to include the crop (if they’re still planting) in the foreground for the overall portrait of the barn. Depending on the crop it may obscure this view of the barn.
  4. Finally, if it’s a large barn I’ll probably want nice clouds since with a large view there’s always a lot of sky.
This barn illustrates my criteria….
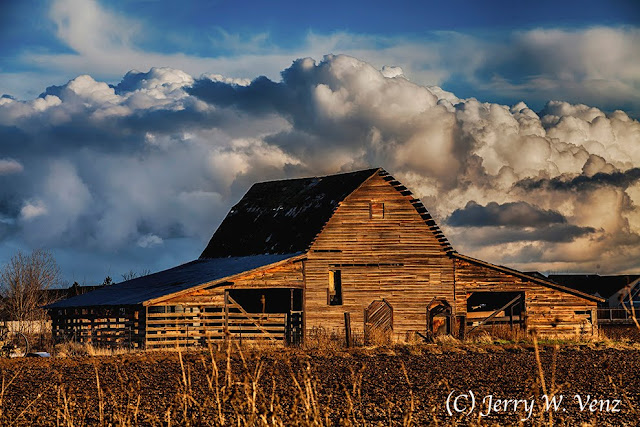

 f10.0 @ 1/400 sec., ISO 400; lens @ 160mm
  1. This barn’s best side is facing West; look at all that great detail!
  2. So,  I needed to use the setting sun that still gave me the shadows at the “A” frame of the barn’s roof; this worked out to be about 5pm in December.
  3. They had been planting corn in this field and that meant this view of the barn would not be possible with a crop of corn seven feet high.
  4. The Big issue for me was getting a nice big cloud structure behind that big barn.

It took two years for all these criteria to coincide for this barn’s portrait. Why so long you ask? Well, I’m a full time professional photographer and my paying clients come first. That means that my outdoor family portrait sessions usually happen one or two hours before sunset—and that’s also prime barn photography time. 

Back to this barn….

f10.0 @ 1/400 sec., ISO 400; lens @ 150mm
After I get the overall view I start slicing-up the barn into detail images. I love the shadows here that create the three-dimensionality necessary to create textures and the drama that we as artists should seek.

Flash forward almost two years….

f16.0 @ 1/250th sec., ISO 400/ Lens @ 75mm
This barn is still standing and I finally decided I wanted a corn crop in the foreground! Of course, they had planted other types of crops in the intervening years—so, I had to wait for the corn crop (again!). Drat those Idaho farmers and their pesky crop rotations—guess they know what they’re doing!

This is the image I had pre-visualized.…

f16.0 @ 1/250 sec., ISO 400; Lens @ 123mm
Love the corn reaching for the barn…and that great shadowed texture on the face of the barn, with nice clouds behind it. And lastly a B&W conversion to make the scene really dramatic.  I used one of my favorite B&W conversion plug-ins—NIK, Silver, Efex Pro 2 using the fine art process preset (with my changes to taste) and an overlay of one of NIK’s film types. In this case I used their T-Max 100 film emulation

Next week I’ll continue with this topic showcasing other barns in my quest to create art and preserve some history.

Always open for questions….’Til next week…

Author:  Jerry W. Venz, PPA Master Photographer, Craftsman
Training site:  http://www.LightAtTheEdge.com
Client site: http://www.TheStorytellersUsa.com

Tuesday, December 19, 2017

B&W vs COLOR WHEN AND WHY THIS PRO CONVERTS

I love really powerful B&W images. Like a lot of young photographers in the 1970’s I learned the art and craft of photography in a home darkroom hand processing 35mm film and then printing my own B&W prints. I studied the work of Adams and Weston and, my favorite to this day, W. Eugene Smith. But I also love the color work of Pete Turner. It was his influence that led me to do color printing using the Cibachrome process. My philosophy is—if you’re going to do color—do color big time!

Too many photographers today use B&W as a fall-back, thinking well if it does not work in color I’ll convert it to B&W.  It’s just too easy today to convert so the thought process about color vs B&W at the point of clicking the shutter is gone! In the film era we planned in advance (remember Ansel Adam’s pre-visualizations?) what our final image was to look like. If I had a subject in mind that had to be in color I loaded-up Kodachrome or Ektachrome because I was going to print it on Cibachrome. That same thought process applied to B&W; except I had far more choices in B&W paper to choose from.

So, lets look at a couple of different subjects and my thought process on color vs B&W in the digital age…
f18.0 @ 1/4 sec., ISO 400
When I walked-up to this plant (Canna Durban) I already knew that color was its most compelling feature. That is what drew me to it from over fifty yards away!

Here it is in B&W…

I converted the image using the NIK, Silver Efex, Pro 2 plug-in. While this B&W rendition is graphically pleasing it just does not tell the viewer what makes this plant special—its colors!

For this next subject I’ll start with he straight-up color version of reality….
 f11.0 @ 1/400 sec., ISO 400
Now this color version has the nice lighting skimming the old barn’s face as the sun is setting, but the scene is just too pretty.  When I first saw this place (a rock quarry) I thought those long slabs of rock on the ground looked like coffins.  So, I decided pretty wouldn’t do I wanted creepy


So, I chose to process this image using HDR, Efex, Pro 2 — tone mapping/single image—using the B&W Art preset.  Then as usual I modified most of the settings to get more texture in the barn’s wood and drama in the sky.

Now the scene has the creepy drama I had in mind when I first saw it.

While it’s a lot easier today to go from color to B&W and we now have an infinite variety of ways to modify an image with software and plug-ins we, as artists, must sill have a vision of what we want to say to our viewers and clients.  Merely producing “pretty pictures” of things exactly as they are, using a point of view that any amateur could do, won’t get you noticed as an artist.

I alway entertain questions….’Til next week….

Author:  Jerry W. Venz, PPA Master Photographer, Craftsman
Training site:  http://www.LightAtTheEdge.com
Client site: http://www.TheStorytellersUsa.com

Tuesday, December 12, 2017

OUTDOOR PORTRAITS USING SUBTRACTIVE LIGHTING

There’s simply no better way to create portraits outdoors than with natural light. And, there’s no better method to create dimensional—that’s three dimensional—directional lighting (with shadows!) than by using the Subtractive Technique.

This technique is very simple. When your subject is in an outdoor environment that has flat light—like open shade—or out in the open with light striking the subject from all sides, you need to subtract the extra light from two sides (or at least 1 side) to create a nice shadow side on your subject’s face.

One of our tools to create subtractive lighting is an Opaque Black Flat, which we call a GOBO or flag—terms I learned many years ago when Kathi and I were doing independent short films. We also use natural gobos on location to create the same effect; especially with group portraits. A natural gobo can be a line of trees , a large bush, or rocks. Anything that will create a shadow side on your subjects face(s), when you place them close to that gobo, is the goal. If you don’t see any shadows then, at that point, your gobo has become a reflector and will defeat our purpose.

Here is an example using the natural gobo technique…

 f4.5 @ 1/400 sec., ISO 800; Lens at 200mm
I placed the boy close to a bunch of trees at camera left.  The sun is setting behind him and it’s about an hour before sunset. The key light is a huge patch of blue sky (the sky is my soft box!) on the right.  The key to creating this light pattern is being able to SEE the shadows and the direction of light outdoors. I think that the reason so many photographers resort to using flash outdoors is that they can’t see the sometimes subtle difference when the subject is placed next to a gobo.

One of the most difficult times to create and see when the light is good outdoors is in fully overcast conditions.  This is when we bring out our 42” black gobo to break-up the very flat light….

f4.5 @ 1/400 sec., ISO 400; Lens @ 200mm
This was done at noon on a very overcast day, in the California wine country, where I was teaching a class to professional photographers on this very topic. Because I liked that fence I sat her on the ground; it also gave her something to lean against. Since that overcast sky gave her severe “raccoon eyes” I stood over her (which also gave me a clean background) and had her bring her chin UP until I saw the light in her eyes. Then I had one of my students bring the 42” black gobo in close to her on the right side creating that nice shadow—and the three dimensionality that the flat overcast sky would have ruined.

In a bright sunny situation with again flat light—because there are no natural gobos—we use the hand held gobo like this….

This was done at an hour and a half before sunset with the subject’s back to the sun. We placed him on a picnic table completely in the open with light striking him from every angle—not the ideal subject placement! So, I had Kathi bring the 42” black gobo Close and angled over his head to block the top light and light from the right.

I learned this powerful yet simple technique over 30-years ago from the master of Subtractive Lighting Leon Kennamer. Leon would usually use two gobos—one horizontally over the subject’s head and the other vertically on one side creating a half-box.  However, he did suggest this single, angled, gobo technique when we didn’t want to set-up stands in a windy environment.

So, as you can see there’s no need what-so-ever for flash outside if there is light—in evidence. The key is not just the light—anyone can see light—it’s all about seeing or creating the shadows to give our subjects natural dimension.  

Don’t just be a strobist—be a portrait artist!

As usual I am open to questions….’Til next week…

Author:  Jerry W. Venz, PPA Master Photographer, Craftsman
Training site: http://www.LightAtTheEdge.com
Client site: http://www.TheStorytellersUsa.com

Tuesday, December 5, 2017

A MASTER PHOTOGRAPHER’S VIEW ON LIGHT; Part 2

As photographers we use our camera to create images that transform three-dimensional objects, in the real world, into a two-dimensional facsimile that we then output to yet another two-dimensional medium—the print, a computer monitor, cell phone, or the like.  It’s out job to recreate the illusion of three-dimensionality in these two-dimensional media, before the image is captured, with the use of dimensional lighting. That is lighting that is Directional—and that means any one direction other than from camera position. It’s that simple.

In Part 1 I mentioned the great classic painters who perfected the art of realistically portraying the world in three-dimensions; and the modern cinematographers who studied those classic painters. I encourage you to check out my list of truly great cinematographers—study their films!

STUDIO LIGHTING—PORTRAITS:

Oddly some of the worst lighting I see these days is by studio photographers.  It’s ironic because studio portrait photography hit its zenith in technique and gained world wide fame in the 20th century from the masters I studied like Yosef Karsh, Aronold Newman, and George Hurrell.  Don’t photographers today study these masters?

What I see way too much are portraits using flat lighting—as though the photographer was going to photograph a postage stamp collection. Flat Lighting is fine if your subject has only two-dimensions.  Otherwise, there’s no excuse for flat lighting in the studio!

It’s in the studio where we have TOTAL CONTROL of both light and camera placement.  In the studio we are God—saying, “Let there be Light” exactly where we want it!

It’s all about direction….

F11.0 @ 1/200 sec., ISO 200
Depending on how many subjects are in the front of my camera my main light is placed at 7, 8, or 9 o’clock when on the left or the reverse 5, 4, or 3 o’clock when on the right.

For this little girl’s portrait I had my main light close to the 9 o’clock position with a soft white reflector at the 3 o’clock. No other fill was used.

NOTE:  The key to directional lighting is to not ruin it with fill light.  I never us a fill light in my studio--not even with groups!

Here’s my basic studio set-up….


That main light, on wheels, is a 7-foot OctoDome by Photoflex; nothing “wraps” better than a large soft box.

And a ballerina on that background….
f11.0 @ 1.200 sec., ISO 200
For her portrait I had the main light at 9 o’clock with it feathered away from the background. No reflector or other fill was used. The “hair light” was left on to light her raised foot.

Showing how a large main light will “wrap” on a group….
This portrait was a Professional Photographers of America International Print Competition Loan Collection Winner in 2014.
In this portrait I placed my main light on the left at about the 7 o’clock position—just out of my camera’s view. I did use a soft white reflector on the right at the 3 o’clock position.

Another Leonardo da Vinci quote:

“The Artist who can make his subject appear to be in the relivo (made to appear to have elevation, with depth and dimension) is he who should receive the greatest praise.”

So, go forth fellow photogs. and work on your “relivo”!  ’Til next week….

Author:  Jerry W. Venz, PPA Master Photographer, Craftsman
Training site: http://www.LightAtTheEdge.com
Client site: http://www.TheStorytellersUsa.com