If you’re looking for a quick, easy, method to photograph reflective subjects then look up tutorials using a light tent or cube because you’re not going to find it here. As a full time professional with over thirty years of studio experience I’ve never done studio photography the easy way. The easy way is boring—like the results of just sticking a product in a light cube—and rarely produces anything striking, different, or creative.
Most photographers using light cubes usually create flat lit subjects floating in a featureless void that is good for web product catalogs. This technique is also good for quick through put, not creativity. Whereas the studio photographers that built a custom set with complementary backgrounds, specialized product support and lighting designed to best showcase the products details always made the product appear more valuable and worthy of a hi-end catalog.
I’ve found over the years by doing it the hard way that even if I fail in a studio set-up I always learn something valuable that improves that “shoot” and others in the future.
So, here’s my super shiny target pistol as a nice example of a difficult reflective subject…
 |
|
f13.0 @ 1/125 sec., ISO 400: Lens @ 170mm
|
And just to make it more difficult I placed the pistol on Mylar over a rough surface!
Background & Mylar:
- I chose one of my hand painted, brown tone muslins, because it went nicely with the grips on the pistol.
- I used the Mylar for two purposes:
- 1) The Mylar reflects the background giving me a foreground and base that color matches
- to the background exactly.
- 2) The Mylar also gives me kicker reflections onto the underside of the pistol’s barrel.
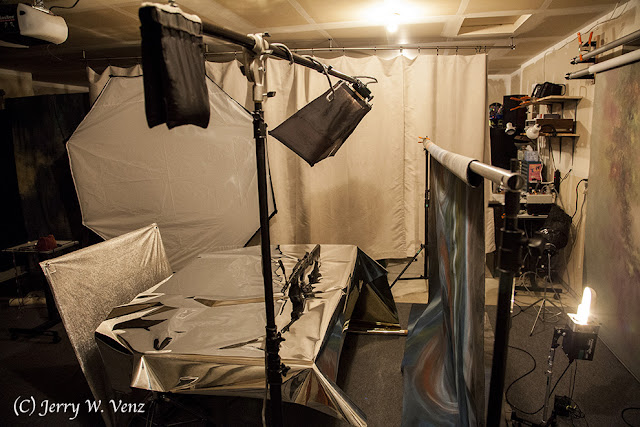
Here’s my lighting set-up….
 |
| Front View |
The only thing different here is the background change-out for the photos of a rifle. As you can see I only used ONE LIGHT and a REFLECTOR!
Main Light: A Larson RS 9”x24” Strip-light
Reflector: A Photogenic 40”x40” Sil Foil Reflector
Here is a side view of the lighting set-up…
 |
| Lighting Side View |
Important: This is the most critical illustration of my set-up as it shows the Direction of the main light and its Relationship to the reflector.
NOTE: That the main Light is NOT Pointed Directly at the gun; It’s pointed at the reflector. Or, more precisely, my overhead main light is aimed so that tis trailing edge is just missing the top edge of the gun. This is why the modeling lights on professional studio flash units are so valuable. In a darkened studio the modeling lights on each flash head tell you exactly where each light is pointed showing us its effect. In this case I merely tilted the overhead main’s soft box down until I saw its light hit the top edge of the gun and then tilted it back up just enough to miss its directly illuminating the gun. Why? If you point your main light at the highly reflective subject the highlights created will all just blow-out, and blown-out highlights—especially with digital cameras—are not recoverable.
Background Light:
To illuminate the backgrounds for these gun photos I tried something different. I used back lighting instead of the usual front lighting often used in the studio. Why?
- I wanted a softer, lantern like, look to the background.
- Without front lights and their stands my walkway behind the prop table was cleared so I could more easily have access to make these adjustments to the main light and the guns.
This shoot-through technique worked really well, but because theses hand painted muslins are so thick I did have to use one of my photogenic 500 watt second power lights at nearly full power to be able to use f13.0 for my aperture; and than I had to go to 400 ISO to get the exposure I wanted.
Getting the Light on the gun:
The position you see of the silver reflector in front of the table is not exactly where it was as I took the images of the guns. I had to minutely adjust the tilt of the silver reflector for each gun or knife as I watched the reflection of the overhead main light on the front surface of each gun.
Hope you enjoyed….’Til next week…
Author: Jerry W. Venz, PPA Master Photographer, Craftsman
Training site: http://www.LightAtTheEdge.com
Client site: http://www.TheStorytellersUsa.com
No comments:
Post a Comment