Tuesday, April 30, 2019

GHOST TOWN FINE ART PHOTOGRAPHY - SILVER CITY, IDAHO; Part 1


I’ve been doing fine art photography of ghost towns and old cemeteries for over 40 years. One of the best ghost towns I ever photographed was Bodie, in the high country East of Yosemite National Park, off Highway 395. But, that was 40 years ago before it started falling apart; now they’re having to prop-up some structures. It wasn’t until I moved to Idaho that I discovered a rich new (to me!) territory of subjects to really enhance my fine art portfolio.

Because of all the mining that took place here in Idaho there are a lot of ghost towns in the mountains—mostly North of Boise. But there is Silver City, one of the best ”ghost” towns just South of us, that is well known for it’s many intact buildings, operational hotel, bar and restaurant. It looks like it’s been coming back to life. At just over 63 miles from Meridian it takes about 2 hours to get there; the last few miles are on a narrow, rutty, dirt road. We went there in June with friends in their 4x4, crew-cab pickup and had no problem. In the winter though the road is impassable except by snowmobile. 

I think Silver City is better than Bodie in many ways. There’s a lot of variety in its buildings and they are still standing without supports. There is a really nice cemetery and the topography is far better; the town is nestled in some hills so there are elevation differences that make for more interesting compositions while Bodie is built on a flat empty plain.

Here’s an example of Silver City topography…

 f11.0 @ 1/500 sec., ISO 400; Lens @ 40mm
This image was a natural for a B&W conversion because I knew that the dark tones of that outhouse would contrast nicely against the old white church in the background. In addition I wanted to get rid of all the greenery in the scene that distracted form my main two subjects.

This B&W conversion was done using Adobe Camera Raw.

A detail image of a front porch….
f5.6 @ 1/800 sec., ISO 400; Lens @ 40mm
Going for the textures in this image: I was drawn to this scene because of the slivers of sun light slicing through the uncovered boards of the porch overhang.

TECH NOTE: Processing for texture; I used NIK’s HDR Efex Pro single image Tone Mapping here; using the Dramatic preset.

A Low-Light Interior Detail…

f4.5 @ 1/25 sec., ISO 3200; Lens @ 32mm
This is the old telegraph office inside the hotel. Set-up in 1874 it was the first telegraph in the Idaho Territory.

TECH NOTE: This had to be B&W so I converted it in NIK’s Silver Efex Pro using the fine Art Preset. Then I selected one of NIK’s Film Emulations (the Agfa100) for the monochrome look I liked best.

Then out at the Silver City Cemetery….

f5.6 @ 1/500 sec., ISO 400; Lens @ 40mm
They have some of the best wrought iron work I’ve ever seen at a cemetery. I enhanced the color and texture of the rust in Adobe Camera Raw for this image.

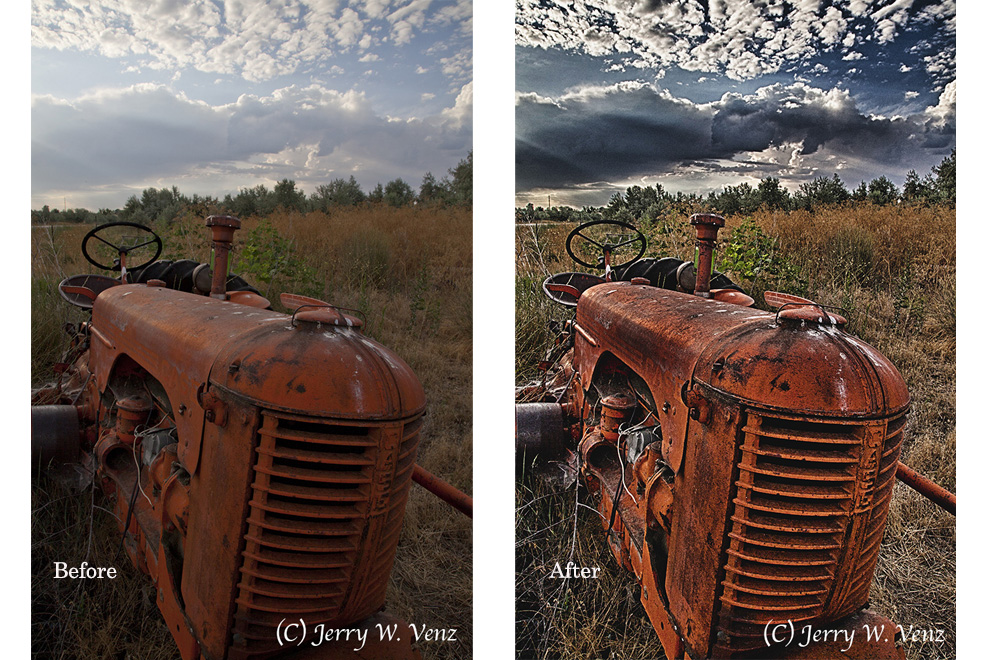
Next week in Part #2 I’ll show some before and afters of images I dramatically altered for artistic effect.

’Til next week…

Author: Jerry W. Venz, PPA Master Photographer, Craftsman

Tuesday, April 23, 2019

PHOTOGRAPHY OF TRACTORS IN THE WILD!


Just one of the many reasons I enjoy living in Idaho is that with agriculture being such a huge part of the economy, culture and history I’ve had the opportunity to photograph so many historical artifacts greatly adding to my fine art portfolio. Some of my favorite subjects are old farm equipment; especially old tractors that have been put out to pasture or those in tractor salvage yards.

You don’t have to go very far from the main population centers of Boise or Meridian to find large farms and ranches either. Only 18 miles from my home town of Meridian is the big agricultural town of Caldwell. While visiting one of my clients there I drove around the edges of some farms when I discovered this tractor…
f16.0 @ 1/320 sec., ISO 400; Lens at 40mm
It was 8 o’clock in the morning in August and the sun had just dramatically reappeared breaking up the cloud cover.

TECH NOTE: To enhance the tractor’s color and dramatize those clouds I processed this image using NIK’s Tone Mapping (single image) using their Sinister preset.

Next I moved-in closer….

Original File                                                                              TM Soft Processed

As you can see with this before and after processing example these old rusty tractors really benefit from NIK’s Tone Mapping. Here I used NIK’s Soft preset with the soft slider changed to accentuate.

Moving to a tractor salvage yard….
 f11.0 @ 1/160 sec., ISO 400; Lens @ 50mm
This image was created in March about 20 minutes before sunset giving me my favorite very directional and dramatic lighting; this is called Short-Lighting. To use short lighting you must SEE the directional light striking your subject and then you rotate your camera position around the “face” of the subject so that the light is almost behind the subject creating a shadow on the “camera side” where you are positioned. I use this style of lighting for portraits of people as well.

Another study in detail….
f13.0 @ 1/40 sec., ISO 400; Lens @ 67mm
This was taken twenty minutes later as the last glimmer of sunlight was striking only the right side of this tractor.  Even though this image has copious texture and detail it was not processed like any of the preceding images. I only tweaked a few sliders in Adobe Camera Raw—I didn’t even touch the Clarity slider!

That’s it for this week!  Should you have comments or questions please don’t hesitate to ask. ’Til next week…

Author:  Jerry W. Venz, PPA Master Photographer, Craftsman

Tuesday, April 16, 2019

WHY I CONVERT SOME COLOR IMAGES TO B&W AT CIVIL WAR EVENTS


I usually know when I snap the shutter if an image is destined to be a color or B&W image because of how I compose a scene. In other words when I’m doing Civil War Re-enactments I will design some to be in color when there is a compelling color feature in the scene. When there’s little color in a scene, if I want an historical look, and I can see good contrast between what will be blacks and highlights then black and white usually wins out.

This image had those features….
f5.6 @ 1/640 sec., ISO 400; Lens @ 142mm
In addition this image had the posed look that we see in much actual civil war photography. Of course back then that posed look was necessary because their cameras’ film (coated glass plates) was so slow that every image was a time exposure (with the camera on a tripod) where nobody could move or they’d get motion blurred photos. That’s why there are no action photos of the Civil War!

I designed this image to be color….
 f4.5 @ 1/640 sec., ISO 400; Lens @ 200mm
Backed-off, using my lens at 200mm, I carefully composed this image to PLACE that flag EXACTLY where it is relative to this soldier while he was moving around unaware of my presence. I purposely chose the aperture of f4.5 to blur the flag and background enough that the flag would not dominate the scene.

This scene had to be B&W….
f5.6 @ 1/640 sec., ISO 400; Lens @ 155mm
This image of the gun crew, taken seconds after they fired a cannon, was visually polluted by the colorful crowd in the background. That’s why I waited for them to fire giving me that cloud of smoke to help obscure the background.

TECH NOTE:
  • To further obscure the background I converted the color image in NIK’s Silver Efex using their Antique Plate 2 preset, which not only creates a nice warm tone monochrome, but also adds a white vignette around the image effectively increasing the smoke in the scene.

Another image designed for color….
 f8.0 @ 1/500 sec., ISO 400; Lens @ 200mm
Again using my lens at 200mm I layered and compressed these elements: the flags and a model of a civil war cannon are on a table while in the background, some 25 yards away, are some full scale cannons.

TECH NOTE:
  • I focused on the Union Flag to make it really stand out and used an aperture of f8.0 to blur the Confederate Flag and the background cannons, but still make them identifiable.

Back to a more historical look….
f5.0 @ 1/1600 sec., ISO 400; Lens @ 40mm
I have two layers of processing on this image. 

  • First, I put the color original into NIK’s Single Image Tone Mapping using their Dark preset to really enhance the cannon smoke.
  • Second, I converted in NIK’s Silver Efex using their Antique Plate 1 for a straight warm monochrome.

Here’s the original image….
Original Color
The color original is just way too colorful and cheerful a setting for a Civil War Re-enactment! In addition I had a sign on the left side that had to be removed.


Sometimes enhanced color is called for….
f5.0 @ 1/200 sec., ISO 800; Lens @ 47mm
Our Civil War volunteers here in Idaho always have their blacksmith there doing authentic iron work of the period. For this image I wanted to enhance the red hot steel, the sparks, and the textures in the anvil so I processed this in NIK’s Tone Mapping using the Structured 2 preset.

I’ll finish with a classic B&W candid….
f4.5 @ 1/400 sec., ISO 400; Lens @ 200mm
Since the Union’s uniforms make nice clean black when converted this was a natural for B&W. This old soldier in the shade of a tree, with dappled light filtering on him in this introspection, was also done with my lens set at 200mm. I used my favorite portrait aperture of f4.5 to create a nice bokeh background enhanced by the lens’ shallow Depth-of-Field.

That’s all for this week.  ’Til next time…

Author:  Jerry W. Venz, PPA Master Photographer, Craftsman
Training Site: http://www.LightAtTheEdge.com
Client Site: http://www.TheStorytellersUsa.com


Tuesday, April 9, 2019

NATURAL LIGHT PORTRAITS USING NEGATIVE FILL


I think most photographers would agree that natural light is the best light for portraits outside. However, as a long time professional portrait artist it’s my job to find or create directional natural light to create the third dimension in our two-dimensional media. If there are no shadows on the subject then you don’t have directional light; you just have flat light. The worst version of this type of light is the effect of direct on-camera flash. 

So, because adding artificial light, in a scene where there is plenty of ambient light, will look harsh and unnatural I propose the use of Subtractive Lighting or what is sometimes called Negative Fill to create natural looking directional light. 

How to Create Negative Fill

There are two ways to subtract light from your subject when out doors:
  1. You place your subject(s) close to natural (trees, bushes, rocks, etc.) or unnatural (buildings, walls) objects that will create a shadow side on the face. Of course it’s imperative that there be light (e.g. Lots of sky light) on the opposite side. 
  2. You place a black, opaque Gobo (or flag) near the subject to create the shadows.
Here’s an example using the location’s natural light blockers…

f4.5 @ 1/400 sec., ISO 800; Lens @ 200mm
The keys to creating this look outside is proper placement of the subject and time of day. I placed the boy where there is a line of trees and rocks about ten feet away on camera left. On camera right there is a large patch of clear blue sky creating the key light. The time of day (about 1.5 hours before sunset) is creating that nice, bokeh filled, back light.

If you’re forced to use an open location with no natural light blockers using a black gobo on an individual works great. In the image below my wife, Kathi, is using a 42” Black Gobo to block side and top light at the same time creating a nice shadow side on his face. 

Hand Held Negative Fill
My Mentor Leon Kennamer

I learned the Subtractive Lighting Technique from the pioneer of its use in still photography Leon Kennamer. He was one of the PPA (Professional Photographers of America) Masters that I studied with in week long courses at the Brooks Institute of Photography some 30 years ago. He taught me the use of the hand-held gobos, but he also taught us about finding the light. His words are always with me when I’m scouting locations. He said that, “THE LIGHT IS AT THE EDGE OF THE FORREST.” That means if you drag your subject(s) INTO the forrest you’ll lose all light direction (called blocked-up light) because you’ve created negative fill everywhere. You must step back out of the forrest until you have that patch of blue sky on one side and the forrest on the other.

Again using natural light blockers on location…

 f4.5 @ 1/320 sec., SIO 800; Lens @ 155mm
So, I’ve adapted Leon Kennamer’s technique using natural light blocking features because when doing group portraits it is not possible to use hand held Gobos on groups of people. In the image above, taken about an hour before sunset, I’ve placed him where a line of trees, on camera left, are blocking all the sky light from that side. The sun is setting behind him and there’s a large patch of blue sky on the right. The key here is to watch where the subject’s nose if pointing; too far towards the tree line and you can lose the light in the eye on the shadow side. This image shows how directional natural light can become with careful subject placement. It’s no different in principle than classic studio lighting.

Have questions or comments don’t hesitate to leave them. 

You can also watch a short 8 minute video about Subtractive Lighting on my YouTube Channel, Light At The Edge Photography, along with other helpful videos:  https://www.youtube.com/watch?v=UevJkSVJy4o

’Till next week…

Author: Jerry W. Venz, PPA Master Photographer, Craftsman

Tuesday, April 2, 2019

USING BACKLIGHT AS THE KEY LIGHT OUTDOORS


Back in the day Kodak publications told amateur photographers to always have the sun at their back to avoid shadows and eliminate lens flare. It didn’t take me long to realize, even when I was an amateur photographer, that there was little drama in creating images with light that came from camera position; that’s just flat light. In fact it’s far better that the light striking your subject, wether in the studio or outdoors, comes from ANY direction other than from camera position. One of my very favorite types of directional light, especially for fine art, is using backlight as the key light when I’m outdoors.

TECH NOTE: 
The Key Light in photography is the dominate light striking the subject. When used properly the key light creates the three dimensionality and the drama that compels the viewer to SEE the artist’s intent in creating the image.

Time of day is the key for backlight….
f8.0 @ 1/250 sec., ISO 400; Lens @ 120mm
I usually go out about 2-hours before sunset to line up my subjects for backlight. I don’t wander around searching for subjects; these are already found subjects that I put on a list as future targets when the weather is good.

This image of sunflowers was taken in the middle of August in California, at 6pm. Flowers and fall colors leaves are naturals for this lighting. 

TECH NOTE:
With really bright flowers, (as with fall leaves), especially in a dark field, I use a spot meter on the leaves so I don’t clip the highlights.

This lighting can work with people too…
f5.0 @ 1/400 sec., ISO 800; Lens @ 200mm
This lighting is NOT for portraits! This type of lighting, as in this image, can create great pictorials of people doing things. 

This image, was done at 8pm, of people walking through an animal exhibition hall at the Idaho State Faire. The dust their feet kicked-up made for a terrific backlight image.

Now, back to some thorny blooms….
 f8.0 @ 1/800 sec., ISO 400; Lens @ 200mm
In this image, the backlight not only lights up the translucent blossoms, but the Rim Light on the cactus thorns is marvelous as well.

TECH NOTE:
It’s important to note that when doing extreme backlight, with the setting sun, that you must control lens flare. In spite of the fad to Create Lens Flare, which only makes professional photographers’ work look amateurish, I control flare to make my subjects look great. With lens flare you lose color density, contrast, and sharpness—things that photography does best!

Here’s how I control lens flare…

My set-up
It’s often not enough to use a large lens shade. So, I’ve added a black flag on a Mathews arm attached to my tripod. I always use this set-up when I’m doing portraits outside. I don’t really care if some photographers think they’re being artsy flaring out their nature photos but I think it’s photographic malpractice to allow flare in a portrait image all the time; it’s also bad business. It’s like improperly using soft focus.

Have a question? Don’t hesitate to ask…’Til next week…

Author: Jerry W. Venz, PPA Master Photographer, Craftsman